Twisted Metal's campaign is a surprising animal. While many people expect something identical to what previous installments have included, the game foregoes the style of throwing a dozen free-for-all encounters at you in order to deliver something more focused and diverse. The best part about it is that there are three memorable boss battles, each of which require an almost un-humanlike level of speed and precision. I've seen a lot of people frustrated over the encounters, so I said to heck with that, let's do the world's first boss guide.
Before we get started, please note that while normal difficulty grants you a checkpoint at the beginning of each phase, hard and twisted difficulties don't. As such, if you plan to beat the game on twisted difficulty because you want to unlock Warthog, be aware that you'll have to do each of the 10+-minute encounters almost flawlessly. It's a lot to stomach, so install some padded walls in your gaming room before you start throwing your controller.
(Note: There are significant, game-breaking *SPOILERS* below. Proceed with the caution of Indiana Jones.)
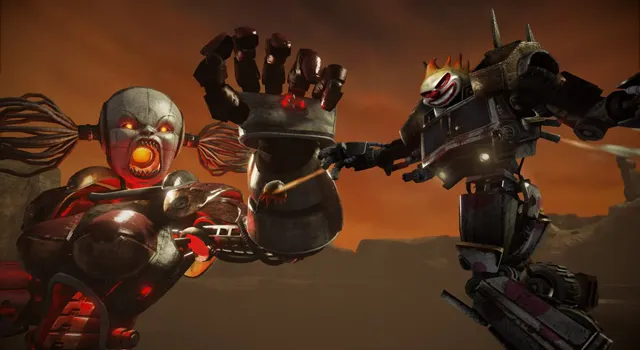
Brothers Grimm
The first time you see the Grimm Brothers show up on your screen, chances are your jaw will drop. In this battle you're pitted against two humongous monster trucks who want nothing less than to smash you into oblivion. You're forced to use Roadkill for this encounter, so a little bit of practice with either him or Death Warrant (who is nearly identical) will go a long way. He has two specials, one which fires an automatic chain gun and another which is charge-based and has three stages. Practice with shooting the blood missile before the fight so you'll be able to take advantage of your specials as much as possible.
Phase 1
The Grimm Brothers thrive on getting in close and smashing you. Drive around and pick-up some weapons around the level and then fire your weapon when you're at a safe distance. The key to getting through this phase is learning how to turn away from the vehicles after initiating an attack. Make sure you're aware of where both enemies are at all times so you don't accidently turn around, stop, and then get crushed. The first phase ends when you destroy either vehicle, so focus on one and don't bother attacking the other.
Phase 2
Now you're going to need to do what might sound like the worst thing possible: get under the remaining monster truck. This phase operates like Nuke mode if you're familiar with it, where you need to stay within a designated spot to charge up a meter. The spot just so happens to be directly under the boss's truck, so approach from behind and make sure you line-up between the back wheels before pushing in.
While underneath, try to stay parallel with the truck so you don't slide sideways and put yourself in the path of the back wheels. Once you've spent sufficient time underneath the vehicle, your gunner will automatically jump to the vehicle and begin planting C4.
As your gunner begins charging the C4, your job is to run away from the truck and survive. Drive around the map and don't be afraid to use turbos to increase the gap. It takes about a minute for the C4 to be planted, so be patient. Once it is planted, you're in charge of detonating the bomb, so hit your attack button and watch the fireworks.
Phase 3
Okay, now the boss is ticked off, and you're essentially back in phase 1 but with only one vehicle to destroy. The boss will have a new shockwave attack which knocks you in the air, but it can be avoided by a timely jump (L1 + R1). Watch out for freeze missiles and unload everything you have on him. If you're low on health, memorize where the two health packs spawn on the map and rotate between them. If you run into a bad situation, head toward the middle of the city where all of the buildings are and use the tight corners to your advantage.
Iron Maiden
Iron Maiden is far from a pushover. As a matter of fact, I would consider her to be the most difficult of the three bosses in Twisted Metal. Not only does this fight require a lot of endurance, but you'll need to be extremely agile. You're able to choose your vehicle this time around, so pick what you're best at, as long as it's something with a speed of two or higher since this encounter requires a lot of movement.
Phase 1
Your goal in this phase is to sacrifice leaders to the missile launcher so you can fire nukes into the air straight at Iron Maiden. At the beginning of the fight, you'll encounter around three regular vehicles and one that's marked with a red icon on the map. You need to destroy this marked vehicle and then pick-up the leader that comes flying out. Once you have the leader attached to your car, which is indicated by a human being dragged by a rope behind your car, head over to the missile launcher. The missile launcher will be stationary for your first nuke, but it will begin moving around the map after your first successful hit.
Controlling the nuke is a bit of a headache since the X-axis is not inverted but the Y-axis is. No, you can't currently configure your settings to change that, so do your best to adapt (unless that's your preferred control scheme anyway). Moving the right-stick forward will increase the speed of the missile. This, in conjunction with evasive manuevers from Iron Maiden's anti-air attacks, will be required to get close enough to hit her. Your first few tries will likely fail, but after some practice you should be able to hit her consistently.
Phase 2
The good news is that she's weakened. The bad news is that she's incredibly mad. Now it's just a showdown between you and one really pissed off robot woman. In this phase you'll want to be extremely alert to her floating head missiles (which are reminiscent of those in Doom), giant flying fireballs, and the boosters underneath her feet when she flies over you. Her missiles should be shot down, but conserving ammunition against them is a bit difficult.
I recommend using shields (right on the d-pad) when needed along with some agile manuevering. There's no time limit here, so feel free to head toward the middle of the map and go into the cave for two health packs and some ammunition. Lay into her with homing missiles and any tracking weapons that you have. If you have difficulty locking on to her, use your right-stick to look up and aim at her. Once she is down to 75% health, you'll enter phase 3, where you'll really be put to the test.
Phase 3
Now you're essentially on phase 2 but with steroids. Iron Maiden now has an area around her that you must stay within to survive. You are only able to spend 30 seconds total outside of the radius until you self-destruct. This is where having a quick vehicle pays off. Immediately get within the safe area at the beginning of the phase, and then pay attention to her movements so you can move along with her. Use your turbo wisely, and don't lose sight of her under any circumstances. The self-destruct is your worst enemy in this phase. Outside of that, continue to throw everything you have at her to bring her to 50% health, where you'll continue onto the next phase.
Phase 4
Okay, now you're really close to her… and she has a lot of AoE attacks. Her shockwave attack is similar to the one in the Grimm Brothers fight, but it's used multiple times in quick succession. If you get hit by the shockwave(s), don't worry too much about the damage since it's minimal, but be very afraid of being launched off of the bridge. You are unable to leave the area without self-destructing within seconds, so use the bridge's barrier as your line of defense, and save the health pack off of the side of the bridge for when you really need it.
The two things to avoid in this phase are driving off of the bridge and Iron Maiden's head missiles. They do substantial damage and they're large, making them very hard to avoid. Your best defense is your offense in this phase, so throw everything you have at her while avoiding the missiles and you should have no problem getting to the next phase, which begins when she hits 0%.
Phase 5
This phase is a lot easier than the previous ones, assuming your health isn't low at the beginning. There is no more self-destruct, and she only uses the fireball and head missiles this time around. Drive through the cave if you need health, and stock up on weapons before heading back and finishing her off. Celebrate your victory with some cake, but save the champagne for the next boss.
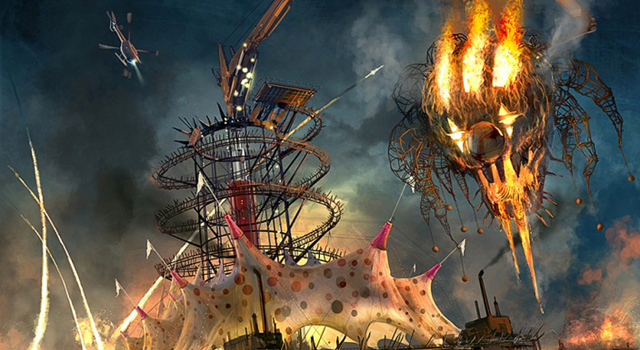
Sweet Tooth's Carnival of Carnage
This fight is just what you would suspect: an insane battle of mass proportions. Out of all three bosses, it's the most unique and demands more patience than a sniper in World War II.
Phase 1
Toward the front of the moving fortress, there's a Sweet Tooth head that will drop down and pour flames from its mouth. Your goal is to blow the thing to smithereens. Unfortunately, there are tons of turrets and vehicles trying to stop you, and they are extremely annoying. To avoid being focus fired, drive around the fortress in a circle and pick up health packs and weapons between the tracks while firing at the head each time you come around. Once you bring it down to 0 health, it'll explode, and you can drive into its mouth to be pulled up into the next phase.
Phase 2
There's a lot of tricky business here. Driving into the glowing target toward the middle of the pinball area will cause a clown with a bomb to be launched. Since doing so requires you to stop for a moment, the dozens of clowns running around ready to destroy you will very likely get close enough to hop onto your vehicle. To get one off, drive into one of the red bumpers, but be careful because it will cause damage to you in addition to killing the clown. But hey, that's better than a clown chopping you to bits.
After a clown has been launched from the cannon, drive over to him and let him hop on your vehicle. That might sound crazy, but trust me. This can only be done if you don't have another clown on your vehicle, so be tactful before you drive up. Once he's on your vehicle, it's showtime. You're going to need to drive off either of the two ramps and launch into the giant clown face before the bomb's timer expires. The easiest way to do this is to line yourself up with the ramp and then turbo once it turns green and is aiming at the face. You'll need to do this three times, and chances are you're going to be sick of clowns by the end of it. Drive into any of the bumpers that are blue to gain some much needed health.
Phase 3
If you think traps are cool now, wait until you do this phase for five minutes straight. You're forced to drive on a swirvy road loaded with traps and death. This entire section is all about trial and error, but there are a few things you should be warned about. For one, timing is everything. The spinning fans, pendulums, and rolling bombs are all consistent, so learning when everything moves will make the process easier. Don't hesistate to use turbo in the pendulum sections, which leave only a small window of opportunity to go through. This entire section may seem like an eternity, but it's only about 90 seconds in length if you go through it without hitting anything, so play it smart and you'll reach freedom before you know it.
Phase 4
Now you can see just what you spent the last 10 minutes driving around in: a giant fortress with a clown head attached to the top. Yup, this is definitely the Twisted Metal we remember. The next phase places you in Talon, which because of its Y-axis movement will take some time to get used to. All controls can be seen on the left side of the screen (thank you, developers!). The trick for this final phase is to deactivate any of the several Sweet Tooth vehicles flying around, pick it up with your alternate special, and then chuck it down the giant clown's skull. It's easier said than done, though. Thankfully, the big-open area grants you many safe spots, as well as quite a few health spawns which are located both in the air and toward the bottom of the fortress.
The quickest way to bring the clown head down is to equip your special and fire it without mercy at one of the Sweet Tooth vehicles in the area. Focus on one at a time. Once it drops to the floor, tap triangle with the special weapon selected to deploy your magnet. Stand over the downed vehicle and it'll stick to your magnet. Fly up quickly while dodging attacks and get about 50 feet above the skull. If you're in the right place, you'll see a glowing cone feeding into the top of the head. Once you're directly above it, and it isn't moving visciously, press triangle and down on the d-pad to drop the bomb into the head. Getting the timing down is challenging since the head moves so much, but you don't necessarily have to line it up perfectly for it to work. Believe it or not, nothing changes throughout this phase, and once you drop four bombs into the clowns head you've officially beaten the game.
If you manage to complete all of these bosses on twisted difficulty, our hats go off to you. Twisted Metal is a challenging game so celebrate with some champagne. You deserve it.