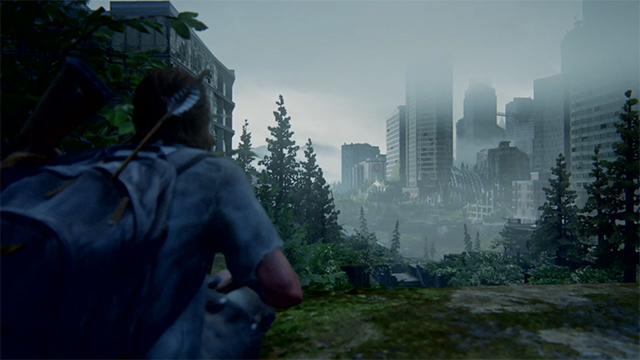
The Last of Us 2 trading card locations are going to be important to point out since they are very small and easy to miss. Getting all of the trading cards will unlock the Master Set trophy as well as the Starter Set trophy. So here is how to find all the TLOU2 trading cards. There will be spoilers in this guide.
The Last of Us 2 Trading Card Locations | Jackson | Waking Up | Seismicayla
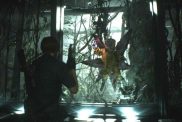
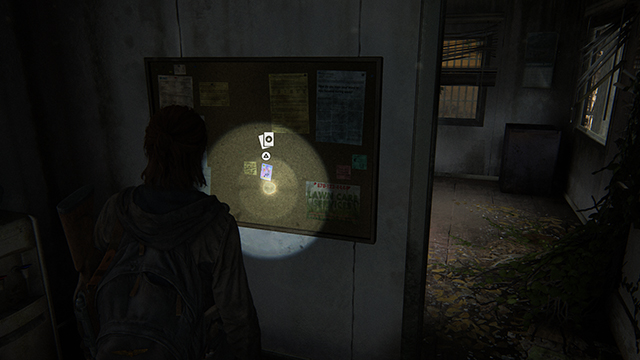
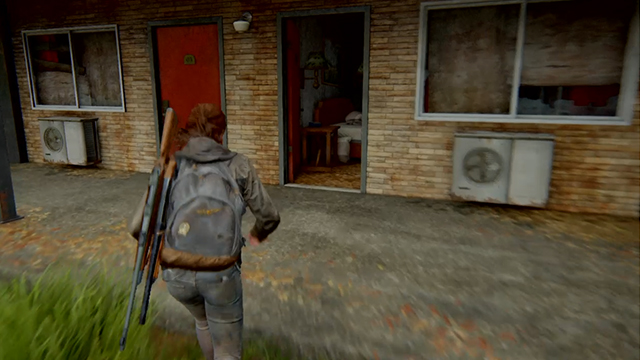
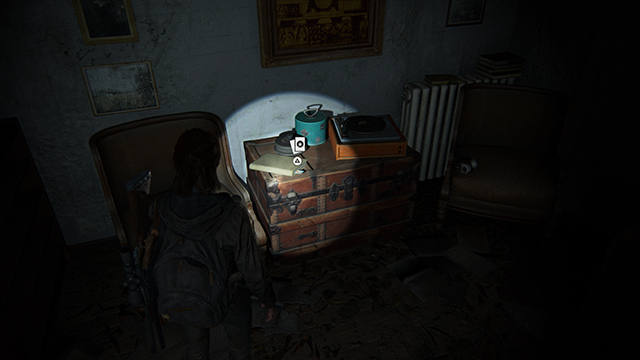
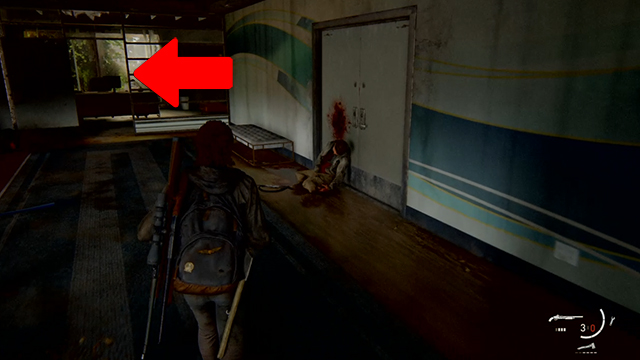
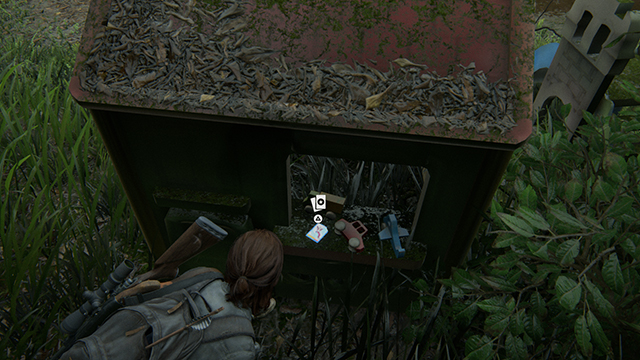
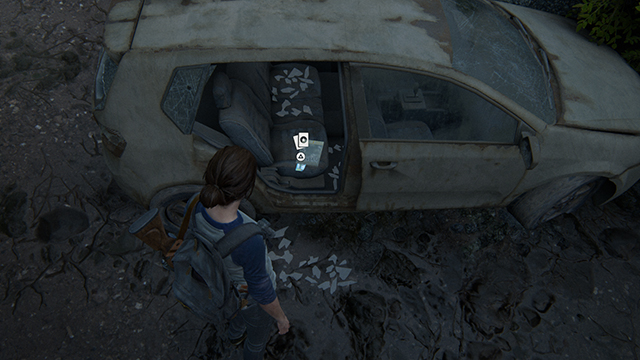
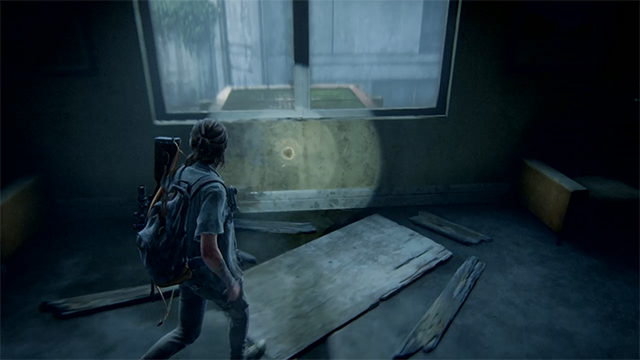
The first trading card in the game is just after opening the door with Jesse to go into the town. Once you open the door, turn left with Jesse and then as he walks down the steps and walks toward the dog, turn left again. The Seismicayla trading card is at the end of that walkway on a corkboard.
The Last of Us 2 Trading Card Locations | Jackson | Waking Up | The Keene Twins
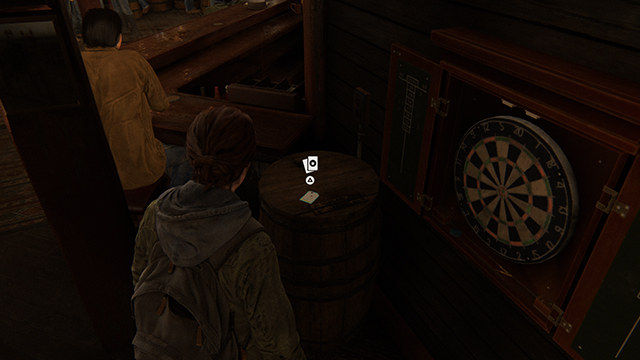
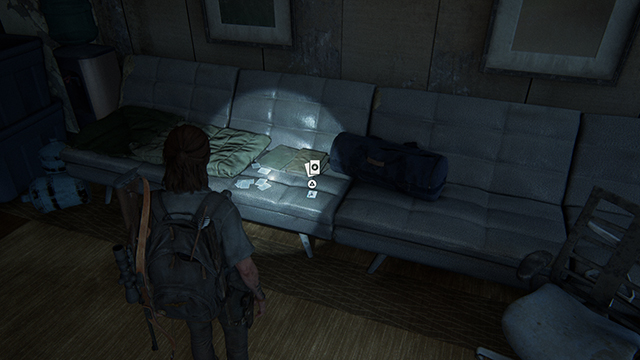
The next card is in the bar. When Jesse walks out, go back behind the pillar with the dead bird on it. The Keene Twins card is on a barrel right behind that pillar.
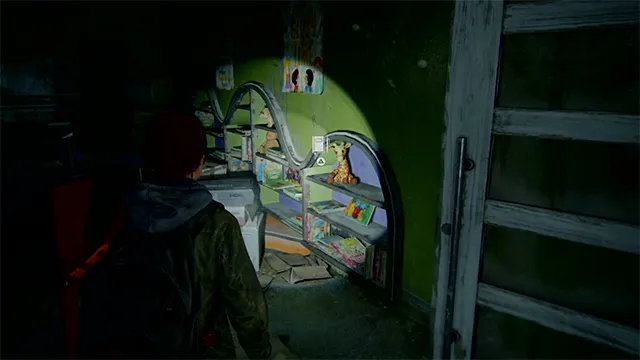
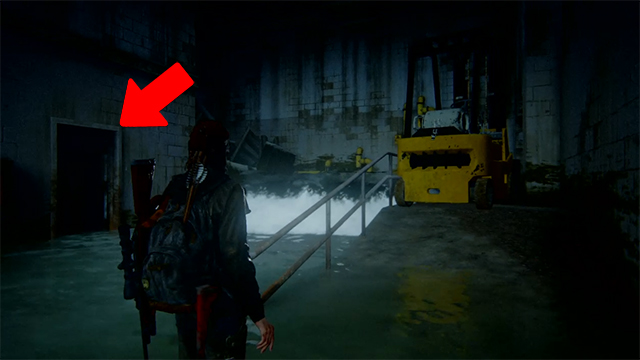
The Last of Us 2 Trading Card Locations | Jackson | Patrol | Tesseracter
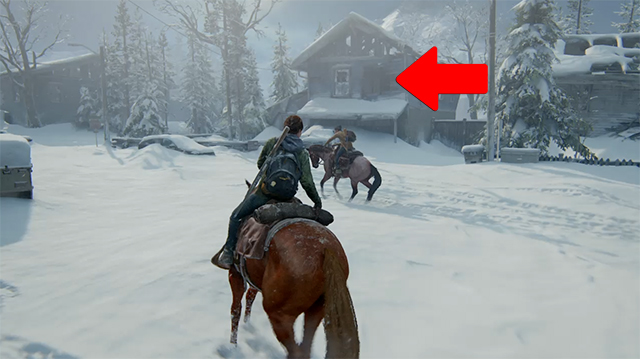
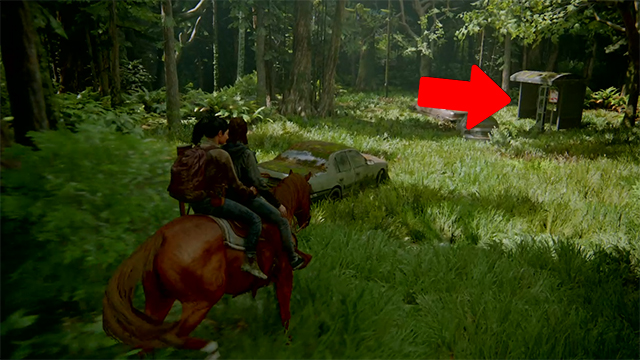
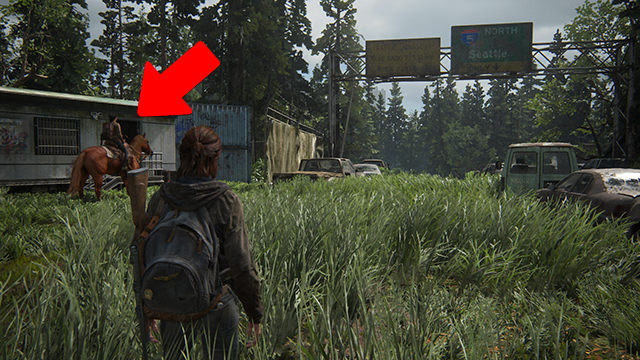
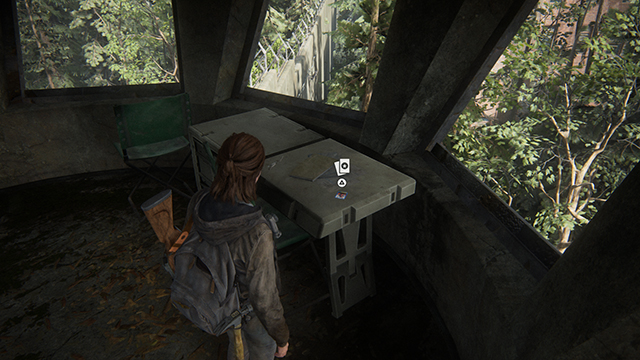
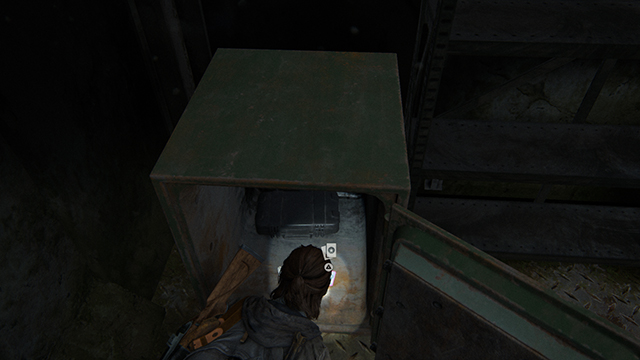
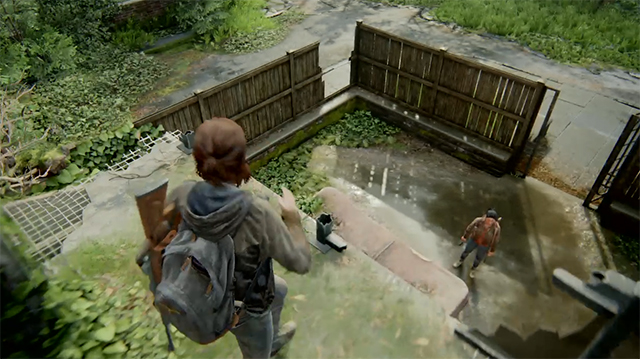
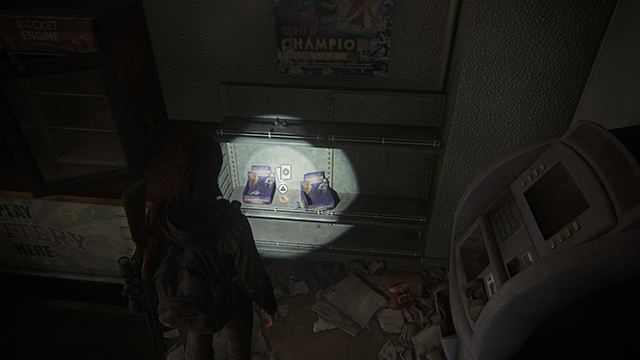
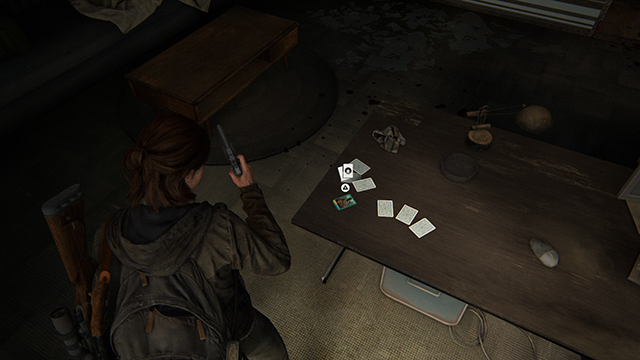
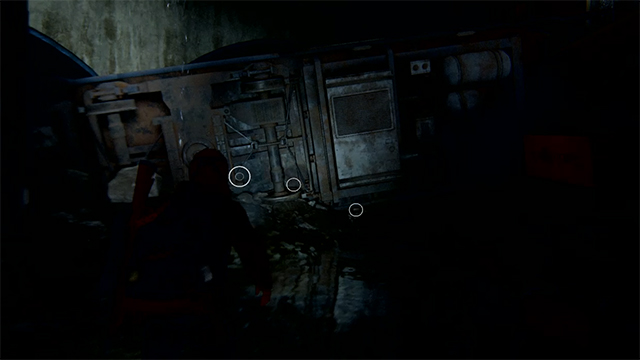
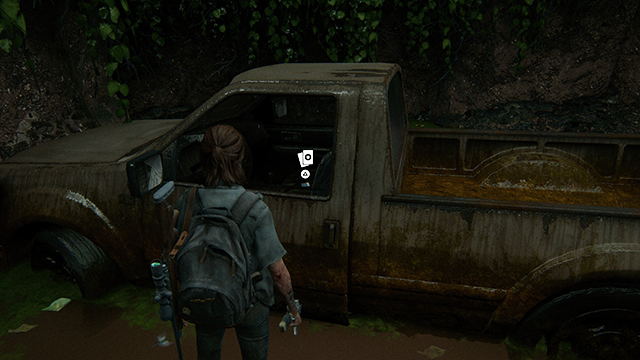
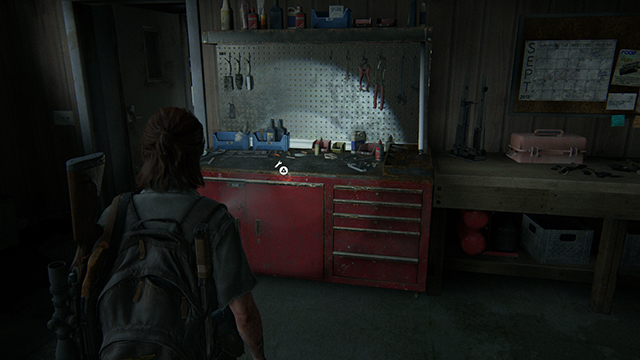
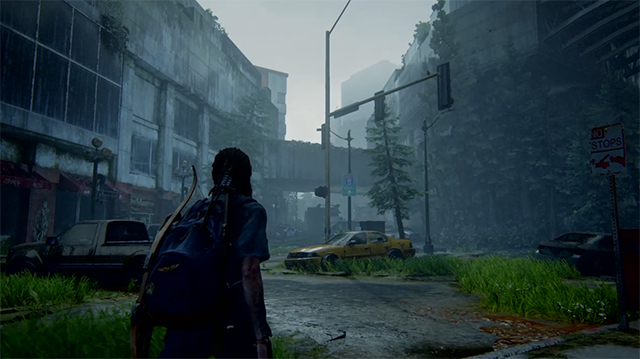
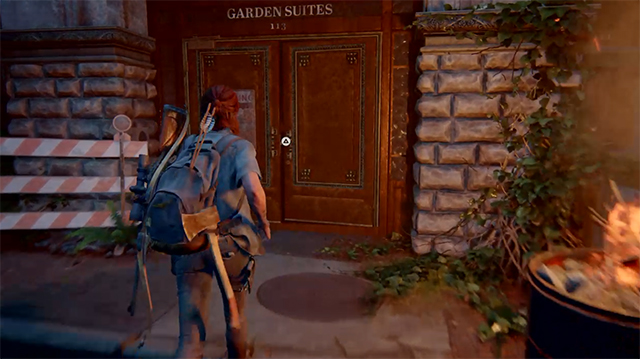
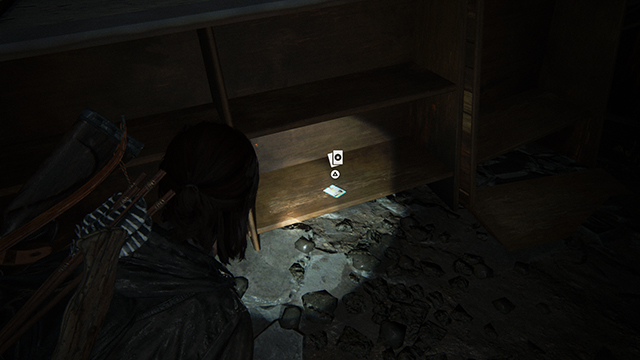
The first card in the Patrol section is in the part when you can get off the horse. Go to the house that the arrow is pointing to in the picture.
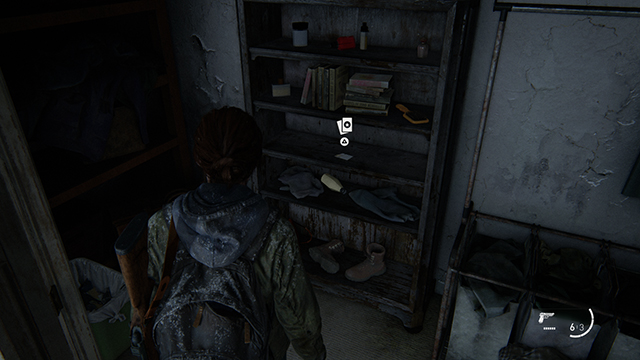
The Tesseracter card is on a bookshelf in that house.
The Last of Us 2 Trading Card Locations | Jackson | Patrol | Laurent Foucalt, CEO SPARK
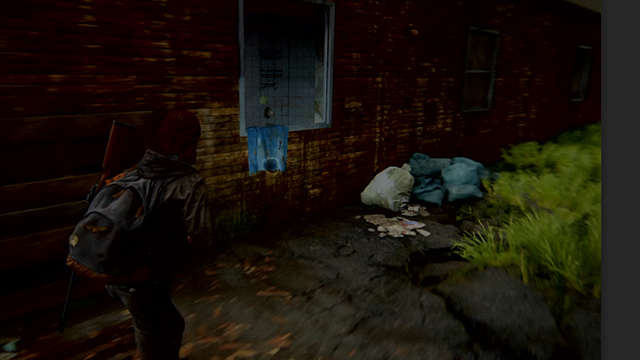
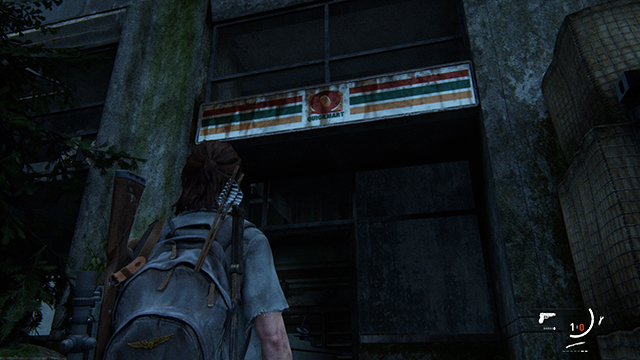
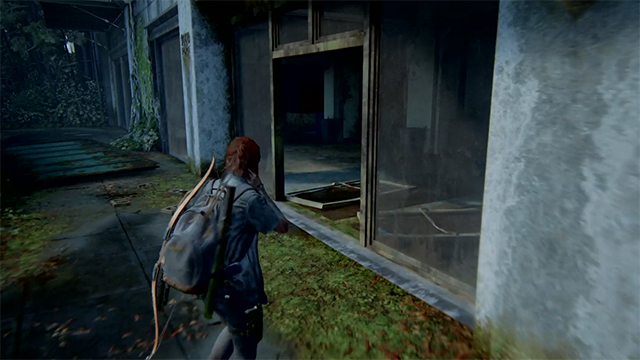
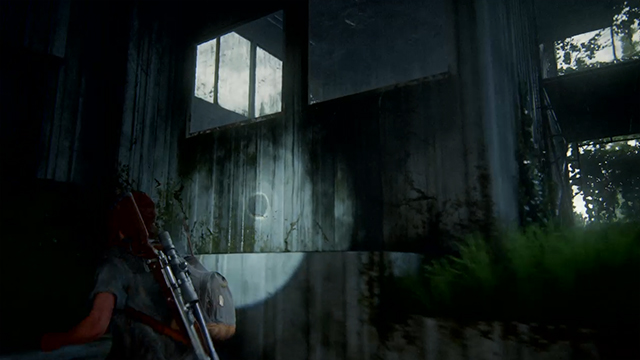
Once you get to the book store, you’ll come across the locked door, which you have to break the window to get past.
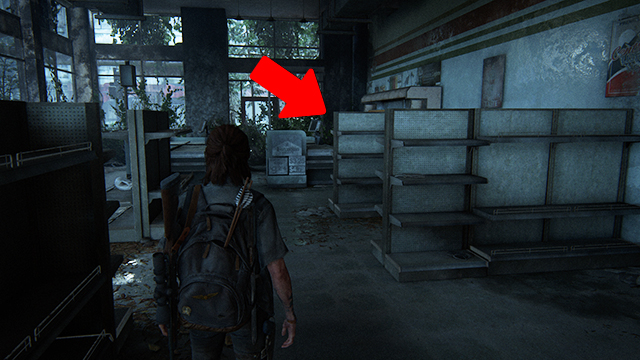
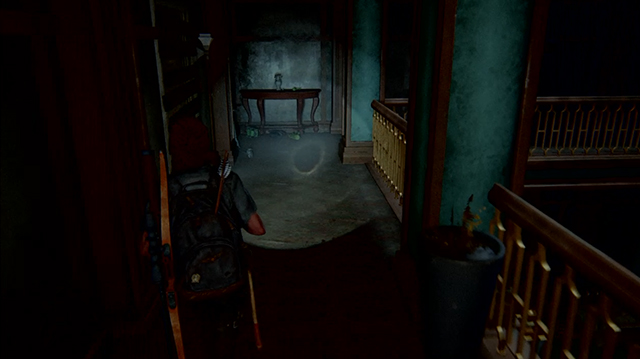
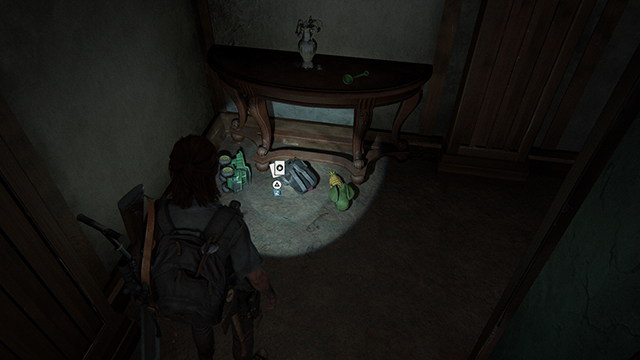
Once you grab the Firefly tag in the next door, you’ll see the journal entry for the giraffe in the previous pic. Turn left and go into the dark room.
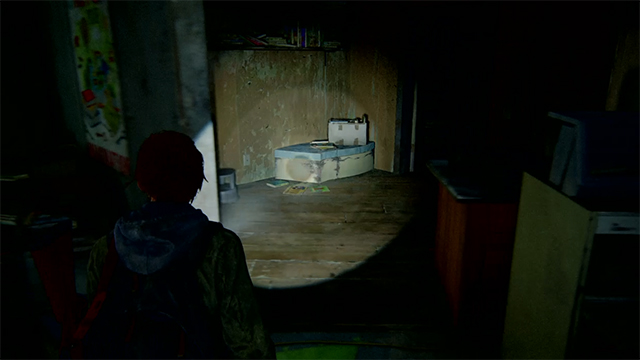
That dark room has a tiny closet.
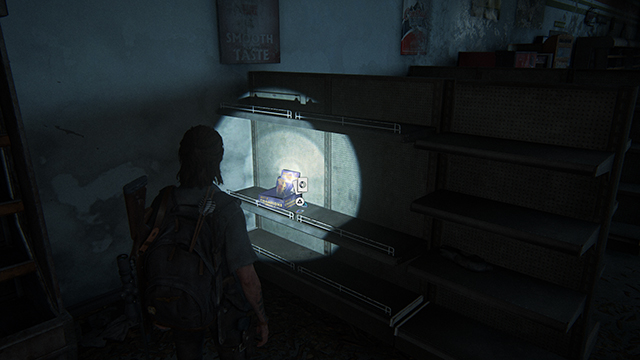
Go into the closet in that tiny room. The Laurent Foucalt CEO card is on a table in there.
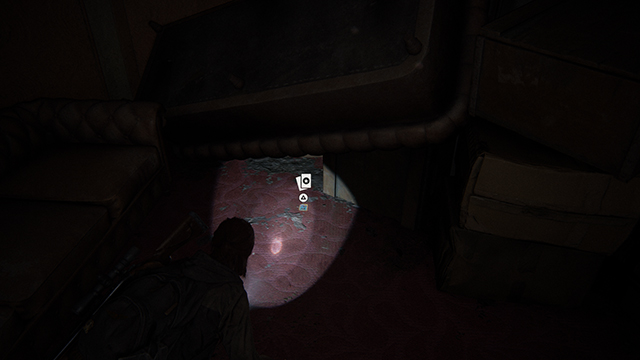
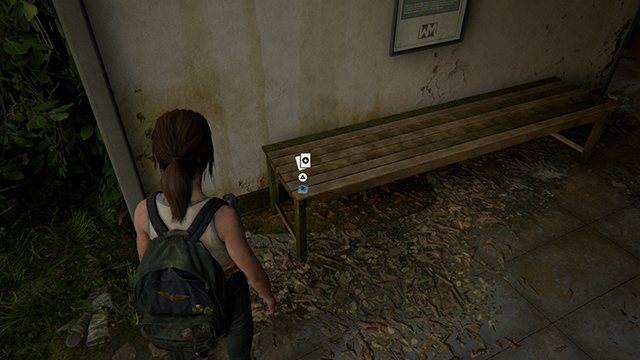
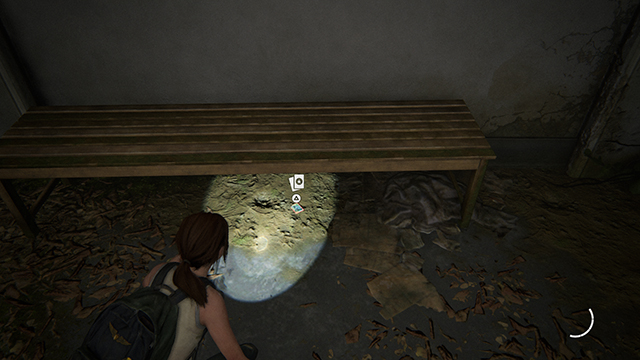
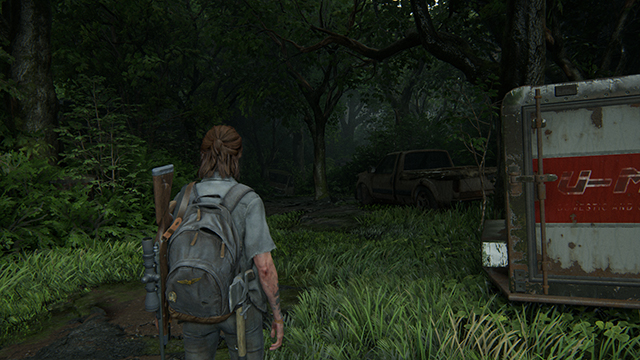
The Last of Us 2 Trading Card Locations | Seattle Day 1 | The Gate | Motivator
Right after starting the chapter, you’ll come to a small opening with some cars and a bus stop. Go to that bus stop that the red arrow is pointing to in the picture.
The Motivator card is in that bus stop.
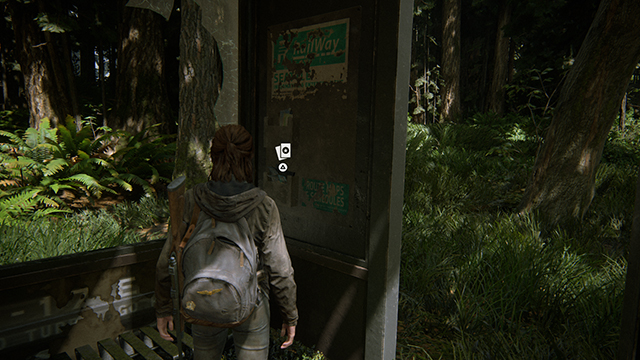
The Last of Us 2 Trading Card Locations | Seattle Day 1 | The Gate | The Starfire Kids
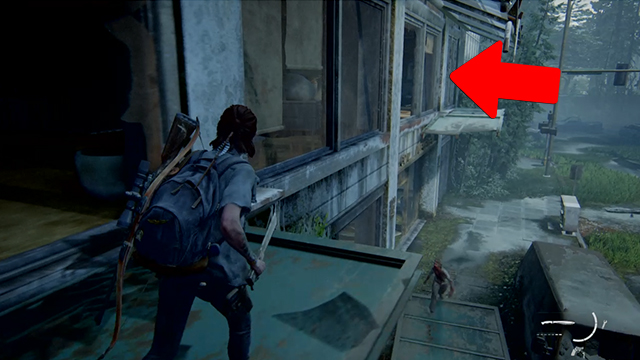
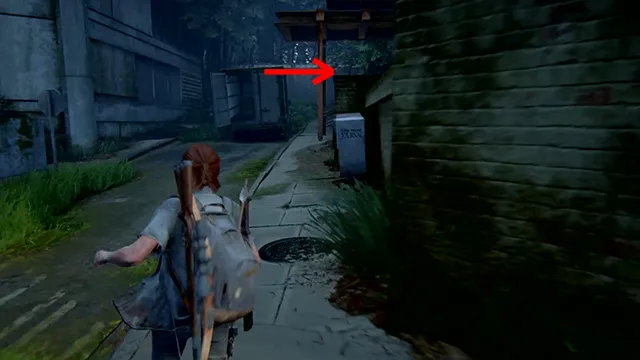
A little bit into the level while still on the road, you’ll come to the section in the above picture with a freeway sign and then a small building on the left. Go into that small building that the red arrow is pointing to.
The Starfire Kids card is on the corkboard in there.
The Last of Us 2 Trading Card Locations | Seattle Day 1 | The Gate | Chessmaster
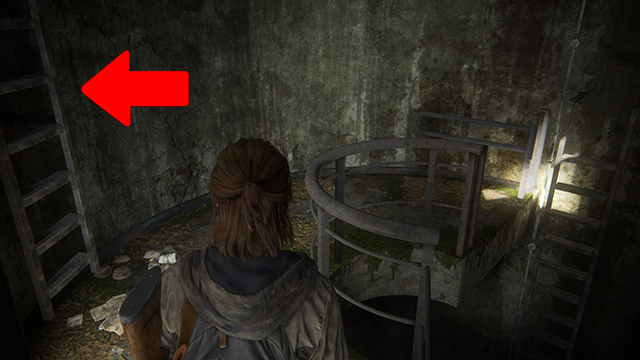
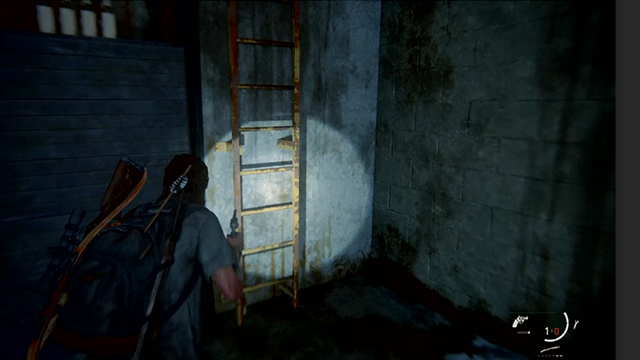
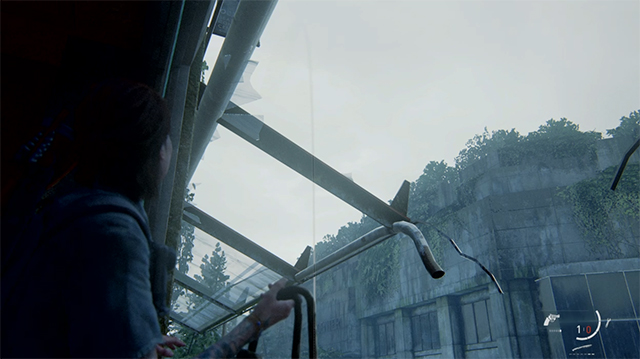
Once you climb up the gate to get to the other side and drop down, you’ll have to walk through a narrow walkway before getting to the above scene. The game wants you to take the ladder down but don’t! Take the ladder on the left (that is very easy to miss) and go up. Again, do not drop down!
Once you climb that ladder, you’ll see the Chessmaster card on a table.
The Last of Us 2 Trading Card Locations | Seattle Day 1 | The Gate | Oozer
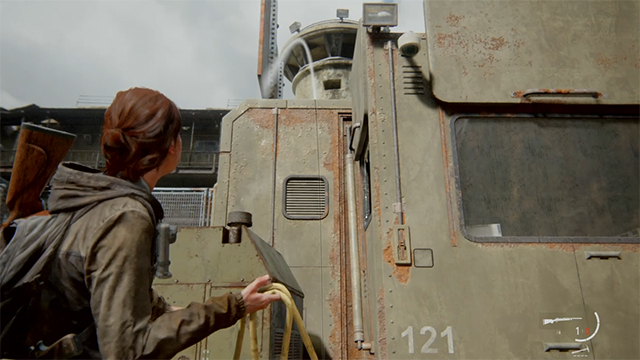
This card is very easy to miss as well. When you are supposed to get the cord and huck it over the fence to plug it in, don’t do that! Instead, chuck it over the building that the cord is attached to like in the above picture.
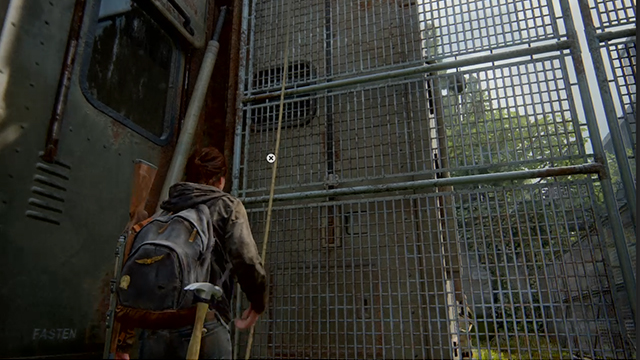
Then go up to the other side to where you threw the cord and climb up.
The Oozer card is sitting near a chair on the floor.
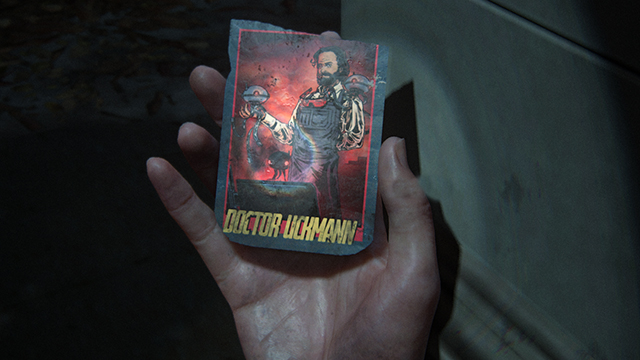
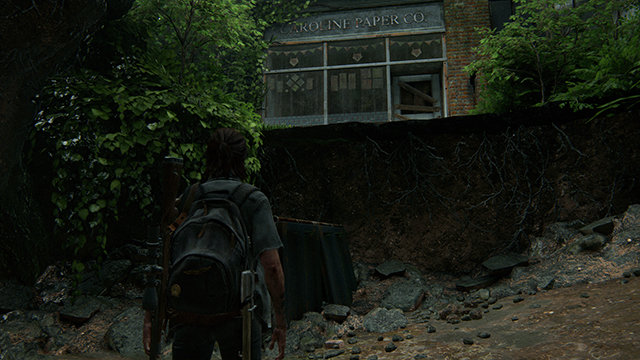
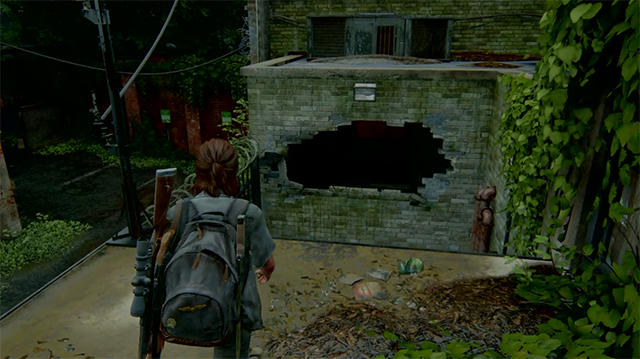
The Last of Us 2 Trading Card Locations | Seattle Day 1 | Downtown | Doctor Uckmann
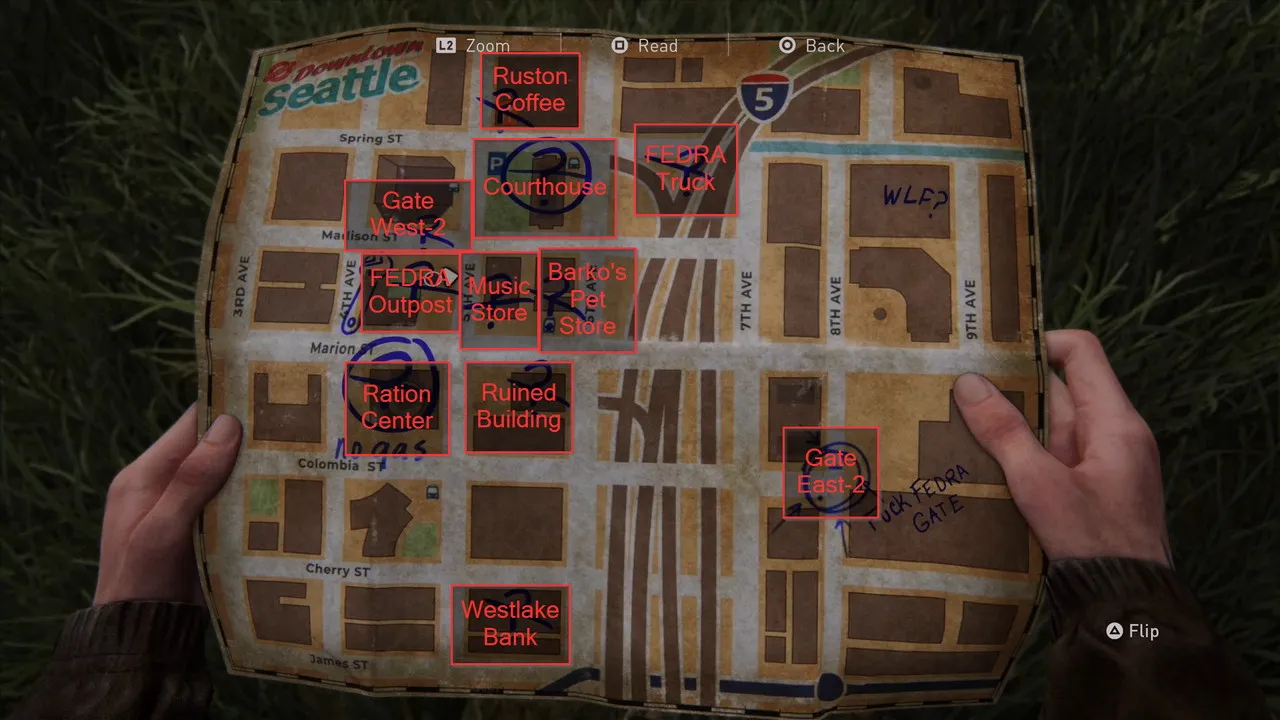
This is in the open are of the Downtown part of Seattle. Go to the Ruined Building part of the map.
Climb up that building by doing some light platforming and then check one of the green boxes. It will be in there.
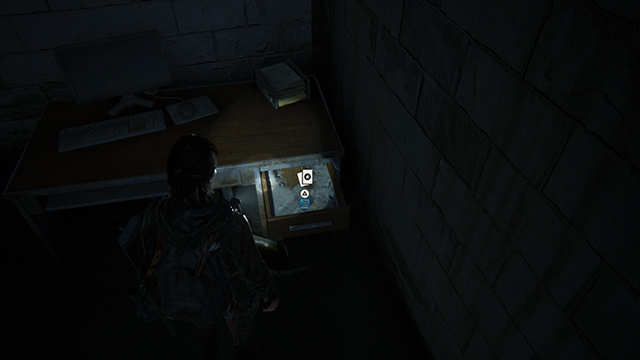
The Last of Us 2 Trading Card Locations | Seattle Day 1 | Downtown | Das Wort
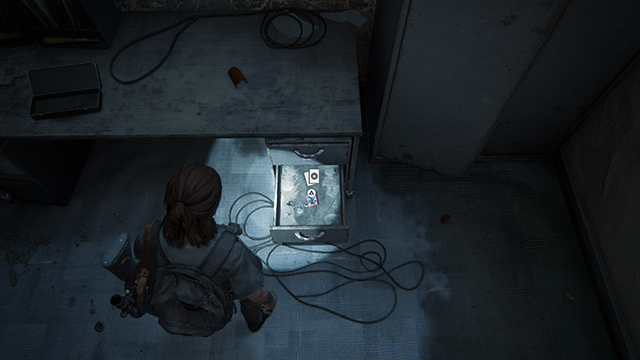
Go to the music store on that map. And once you get there, go inside the front door.
There will be some drawers behind the counter on that first floor. Open them up to get the Das Wort card.
The Last of Us 2 Trading Card Locations | Seattle Day 1 | Downtown | FLO
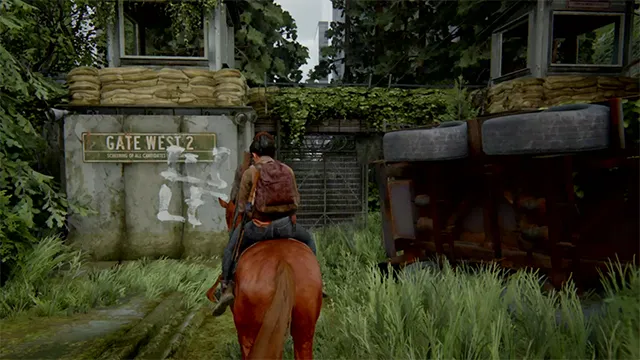
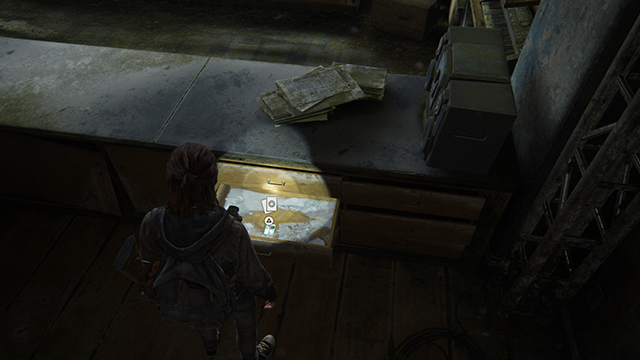
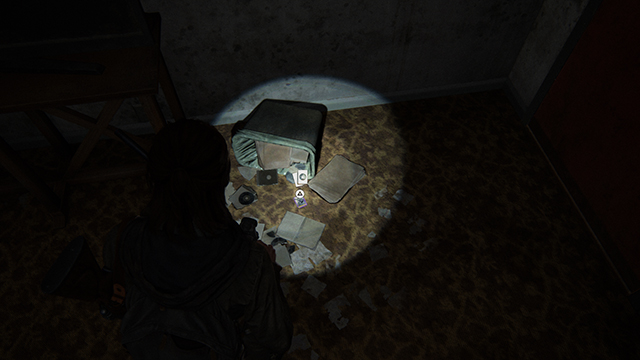
The next card is at the safe at Gate West-2, which is located just southwest of the courthouse on Madison St. Just keep an eye out for the sign. You’ll see a gate that is cracked far enough for Ellie to squeeze through it. You’ll find the safe on a small concrete platform inside.
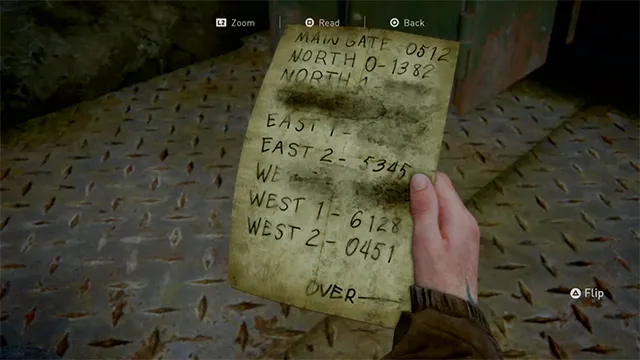
This one is spelled out for you, literally, and might be the easiest code to find in The Last of Us 2. There’s a sign painted on the wall with an arrow pointed at the safe that reads, “Use gate code.” To get the code, open the document titled, “Checkpoint Gate Codes.” Under “West 2,” you’ll find the code for the safe: 04-51. This code may not seem right at first, but this safe is unique as being the only one in the game to have a four-digit instead of a six-digit combo.
Once you crack the safe, the FLO card will be in there.
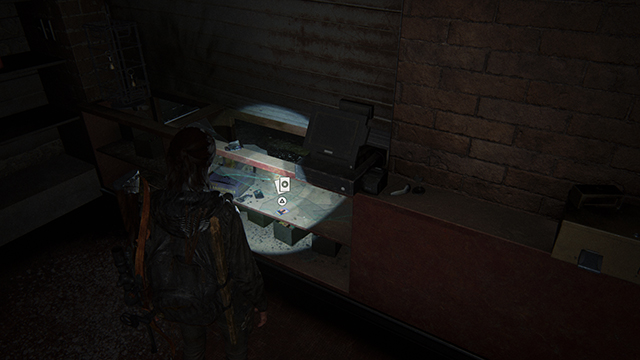
The Last of Us 2 Trading Card Locations | Seattle Day 1 | Downtown | Big Blue
When you arrive at Ruston Coffee (which is at the top of the map), you’ll need to bust out the glass to enter the building. Jump inside.
The Big Blue card is in a drawer behind the counter at the end near the espresso machine.
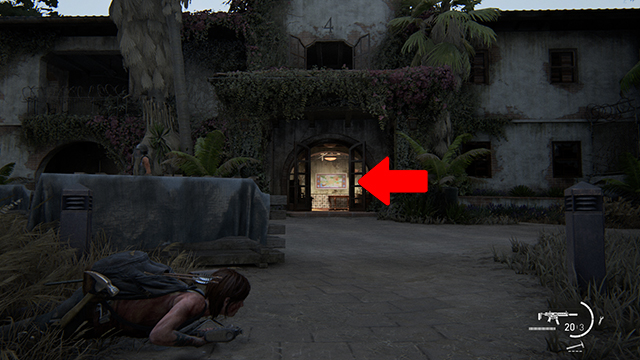
The Last of Us 2 Trading Card Locations | Seattle Day 1 | Downtown | Know It All
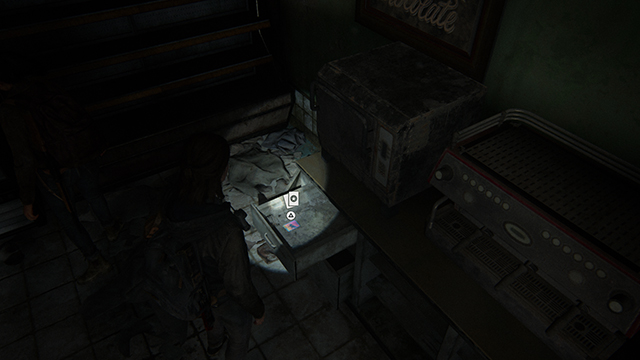
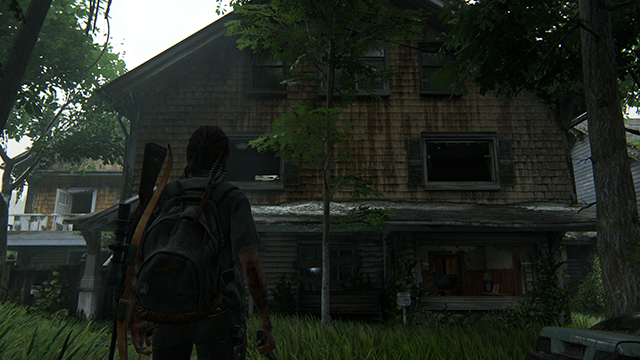
This next card is in the hotel where you fight some infected after opening the Fuck Fedra gate. Go into that hotel and climb up the stairs in the above picture.
When you get up the stairs, go into the room. And then go into the doorway to a second room.
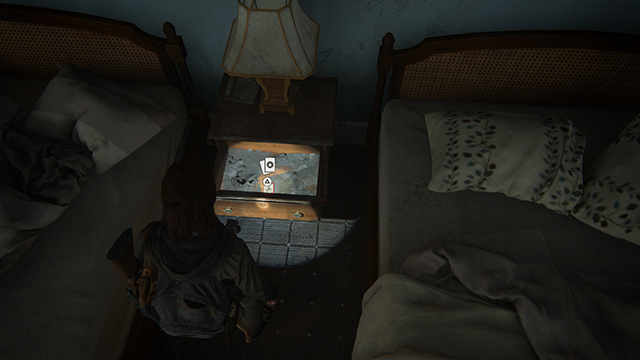
There are beds to the right in that second room. The dresser between the two beds has the Know It All card in the drawer.
The Last of Us 2 Trading Card Locations | Seattle Day 1 | Eastbrook Elementary | Cardio
Once you see the above scene where the WLF soldiers are running into the building, you’ll have to jump across to a balcony like in the above picture.
Once inside, jump open the tipped over couch in the picture.
The Cardio card is in one of the dresser drawers back there.
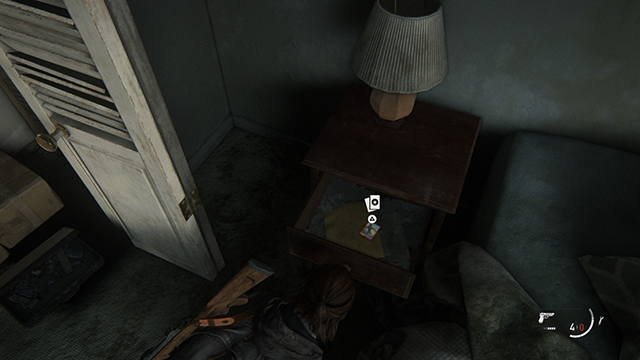
The Last of Us 2 Trading Card Locations | Seattle Day 1 | Capitol Hill | Kinnard, Esq.
After the short cutscene, you’ll have to drop down.
In that same area, you’ll see the above apartment on the right side of the area. Go inside.
One of the drawers on the ground floor will have the Kinnard, Esq. card.
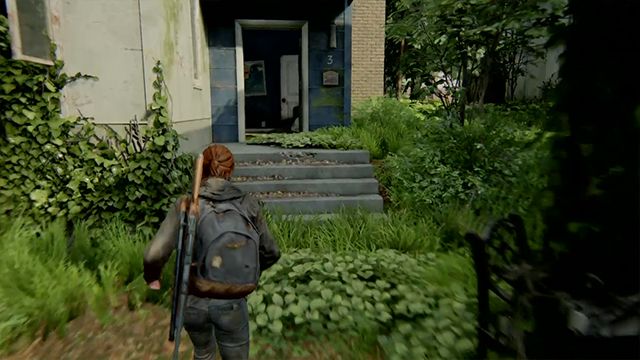
The Last of Us 2 Trading Card Locations | Seattle Day 1 | Capitol Hill | Rockafella
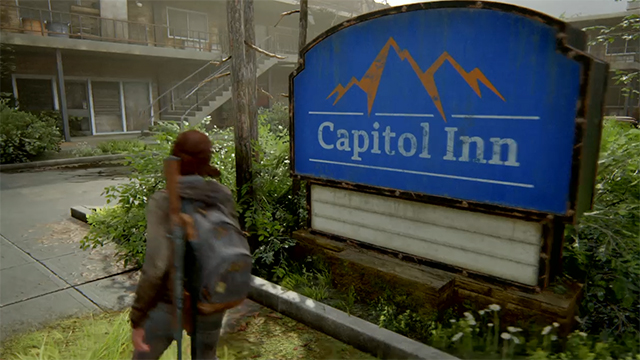
You will make your way through the Capitol Inn.
One the ground level, you’ll see closed, locked red door with a “3” on it and an open one. Go through the open one and jump out the window in the bathroom.
Once you jump the window, go over one window and jump through the window with the blue cloth hanging out.
The Rockafella card is sitting on the ground in that apartment near the trash bin.
The Last of Us 2 Trading Card Locations | Seattle Day 1 | Capitol Hill | Doctor Stem
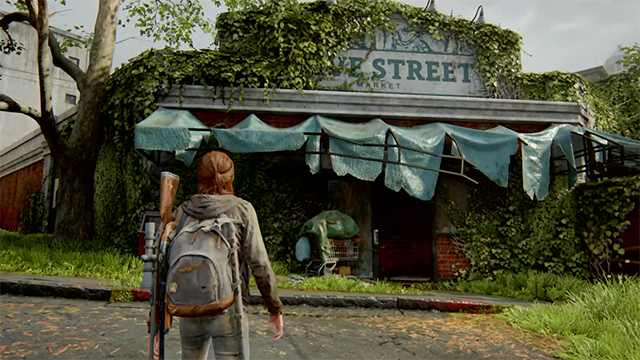
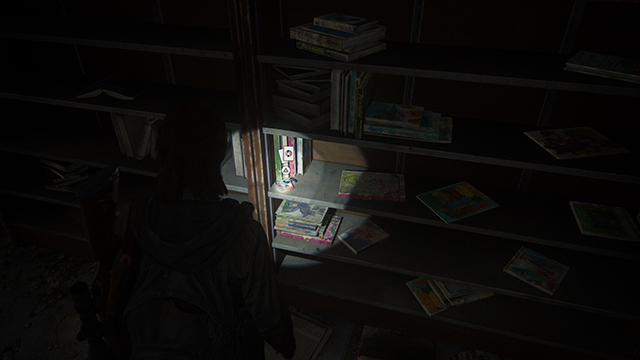
You’ll eventually make your way to a bookstore and coffee station by a gas station. Go inside.
The two stores are connected. Go inside and find the room between them (from the book store, it’s the door by the trans pride flag) by the bathroom. The Doctor Stem card will be in a book as a bookmark.
The Last of Us 2 Trading Card Locations | Seattle Day 1 | Capitol Hill | Sargent Frost
In that same area, you will come across a market like in the above picture. There are multiple ways to get in (through the room, use a door). Pick one and get inside.
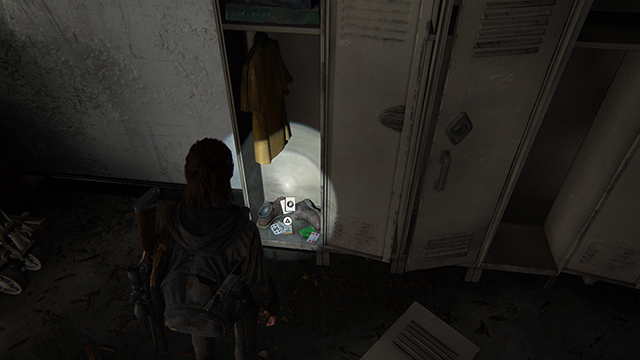
In the back room, you’ll see some lockers. Open one up and you’ll see the Sargent Frost card in there.
The Last of Us 2 Trading Card Locations | Seattle Day 1 | Capitol Hill | Candelabra
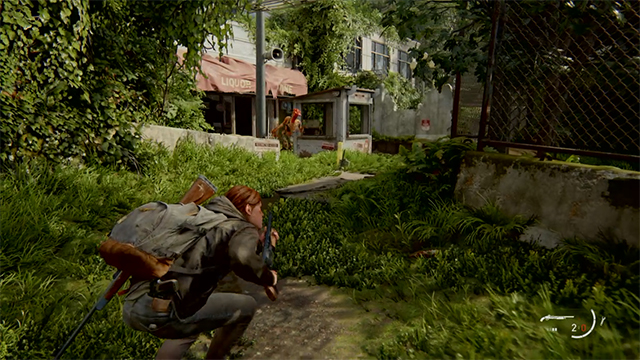
After climbing over a Fedra checkpoint with Dina, you’ll see the above Clicker get gibbed by a mine. Go into that liquor store it ran out of.
The Candelabra card will be in the back on some card racks.
The Last of Us 2 Trading Card Locations | Seattle Day 1 | Capitol Hill | Bizarrebra
In the section with the mines, you’ll come across the following store on the left side of the road. Go inside.
The Bizarrebra card is in the store on the left side.
The Last of Us 2 Trading Card Locations | Seattle Day 1 | Channel 13 | Kimimela
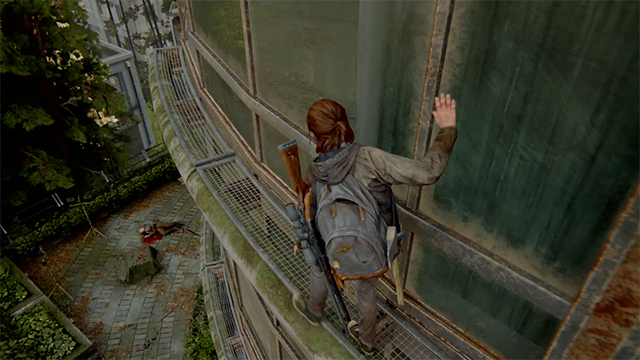
You’ll have to sidle around the outside of the TV station like in the above picture.
This will lead you to an area with a few offices and a dead person with a shotgun next to them. Go to the head office as shown by the red arrow.
The Kimimela card will be on the desk in that office.
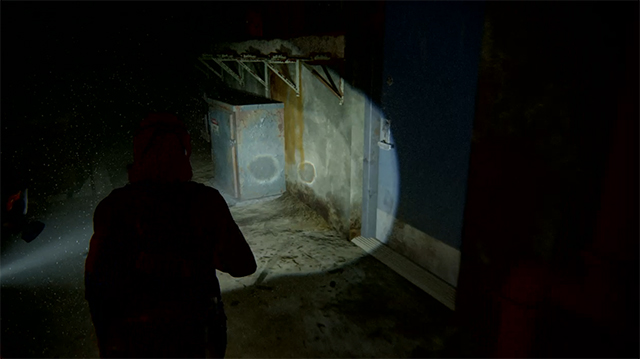
The Last of Us 2 Trading Card Locations | Seattle Day 1 | The Tunnels | The Imp
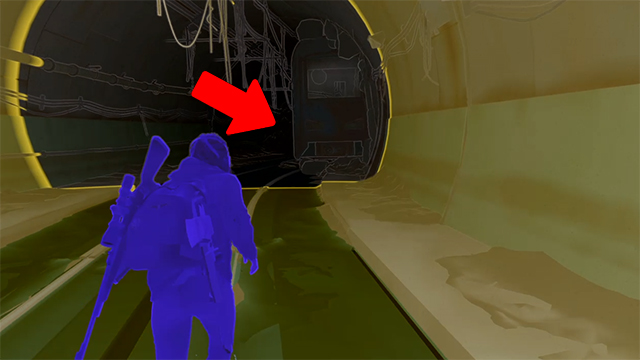
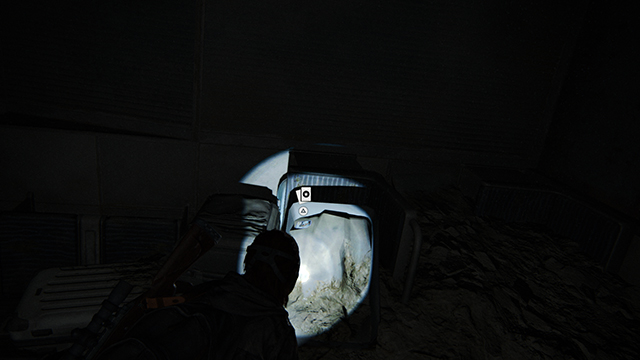
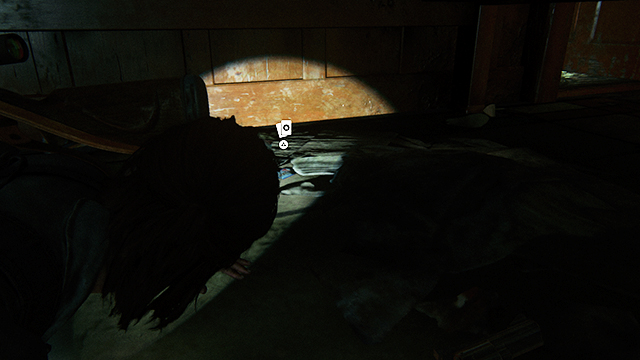
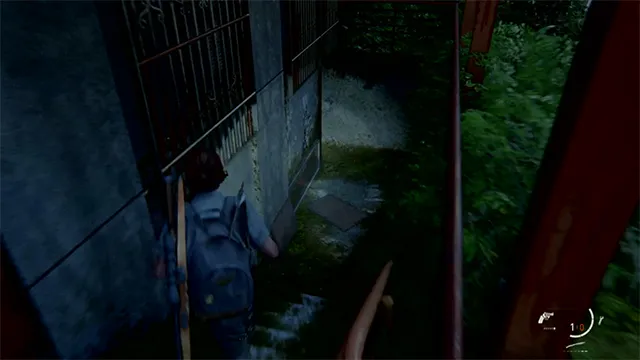
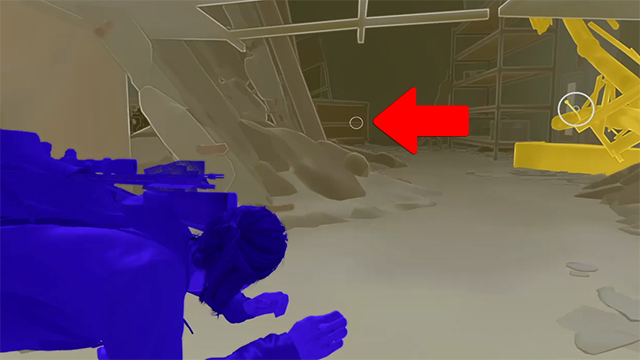
This one is dastardly and almost impossible to see. After the area in the tunnels where you can pit the WLF soldiers against the Infected, you will have to open up a jammed subway car door. After you crawl out from under the subway car, you have to go right into a room with a dead guy hanging through a window. Don’t go in there! Instead go straight to the train car that the red arrow is pointing to.

The Imp card is under that train. It’s just very hard to see. You have to angle the camera a certain way.
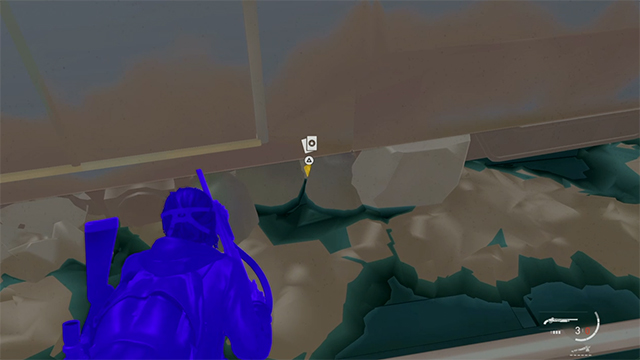
Here’s a better view of it in the game’s high contrast mode.
The Last of Us 2 Trading Card Locations | Seattle Day 1 | The Tunnels | Dr. Daniela Star
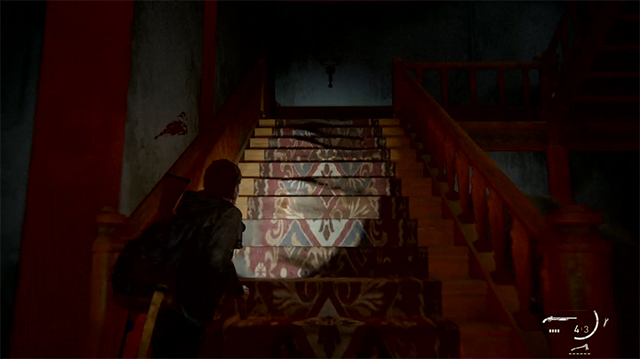
After killing the first Shambler, you’ll have to make your way down a long hallway. Eventually, you’ll get to the blue door in the picture. Go inside.
Crawl under or jump over the table on the right that the red arrow is pointing to.
Make your way through that tight path and the Dr. Daniela Star card will be on the computer at the end.
The Last of Us 2 Trading Card Locations | Seattle Day 1 | The Tunnels | Bastet
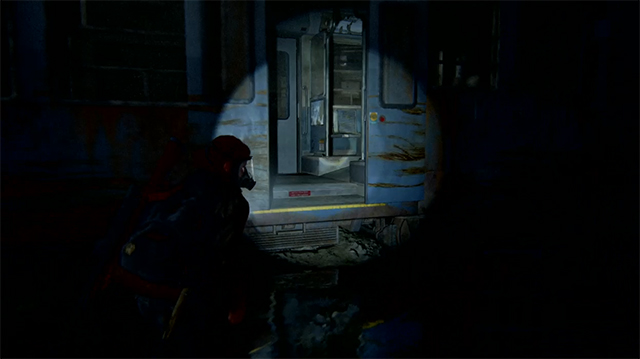
After you burst through a red door and bar it shut, you’ll be on the subway car tracks. Go through this train car and come out the other side.
When you come out, instead of going forward, go around one of the train cars and find the train car in the above picture. You can crawl through a tiny gap at the bottom.
Crawl through it and search the seats for the Bastet card.
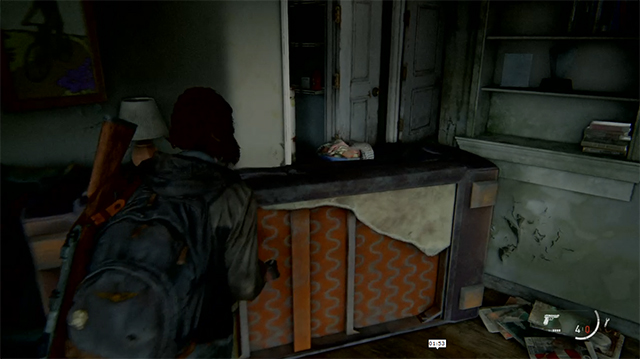
The Last of Us 2 Trading Card Locations | Seattle Day 1 | The Theater | Mortem
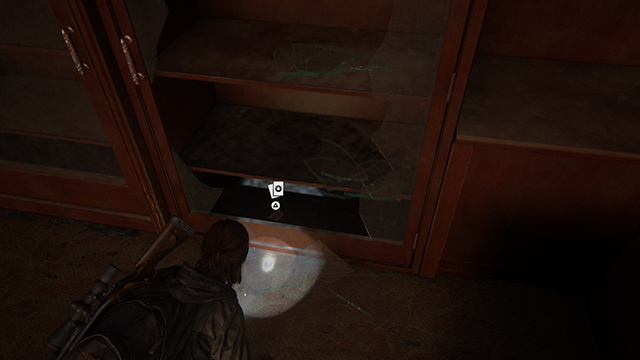
When you get to the theater, go upstairs and you’ll see a bar. Go behind the bar and break the glass in the cabinet. The Mortem card is in there.
The Last of Us 2 Trading Card Locations | Seattle Day 1 | The Theater | Beyond
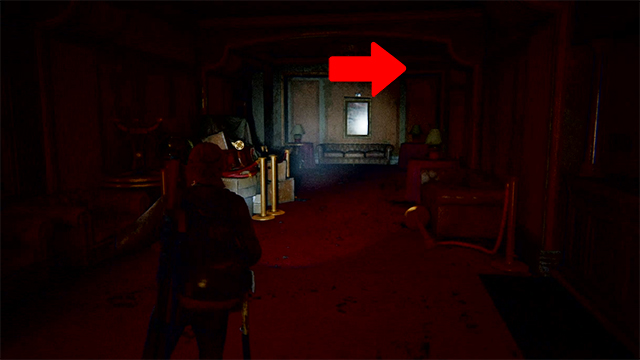
From the bar, continue down the hall as you see in the above picture. Go right at the end.
The Beyond card is under all the mangled furniture.
The Last of Us 2 Trading Card Locations | Seattle Day 1 | The Birthday Gift | The Nighthawk
The Nighthawk card is simply on a bench in the museum between the Triceratops and the Dimetrodon skeletons.
The Last of Us 2 Trading Card Locations | Seattle Day 1 | The Birthday Gift | Saura
After climbing into the Natural History Museum, make your way into the room with the giant moose and the wolves. The Saura card is beneath a bench on the right of the moose.
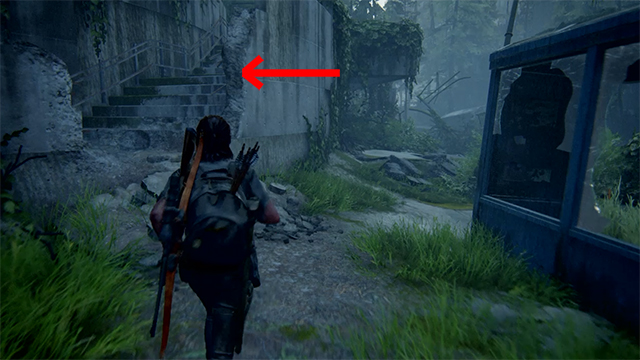
The Last of Us 2 Trading Card Locations | Seattle Day 2 | Hillcrest | Wachumero
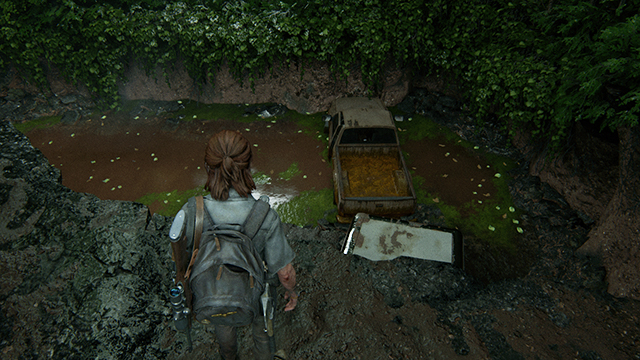
This one is deceptive. Right at the beginning of the chapter, turn around. Drop down into that pit.
Break the window in the truck and Wachumero card is in there.
The Last of Us 2 Trading Card Locations | Seattle Day 2 | Hillcrest | Sahir the Sorceror
After crawling over the truck to get to the second area in the level, a mini-cutscene will play. From there, look at the small moving trailer that you can see in the above picture and go left.
Head down that short path and you’ll see some boxes that you can climb to get into the paper store.

The Sahir the Sorcerer card will be in those boxes. It is tricky to see so tilt the camera.
The Last of Us 2 Trading Card Locations | Seattle Day 2 | Hillcrest | Naledia the Youthful
After moving the dumpster up the ramp and solving that small puzzle, you’ll have to jump through the hole in the picture.
From there, you’ll see a workbench. But look to the right of the workbench.
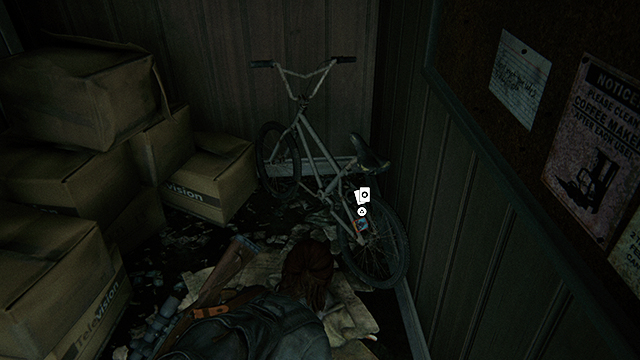
You’ll find the Naledia the Youthful card in the bike spokes of that bike.
The Last of Us 2 Trading Card Locations | Seattle Day 2 | Hillcrest | Brainstorm
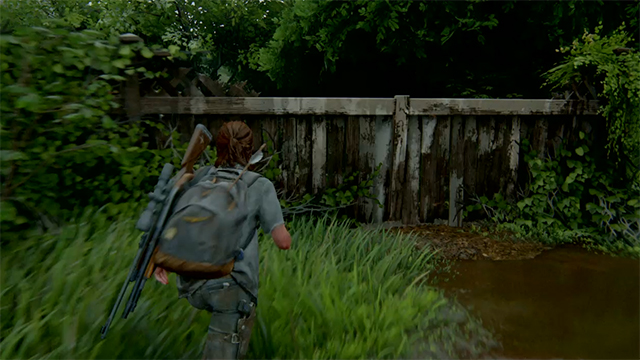
After going up some stairs and taking out some Infected, you’ll have to hop over this wooden fence.
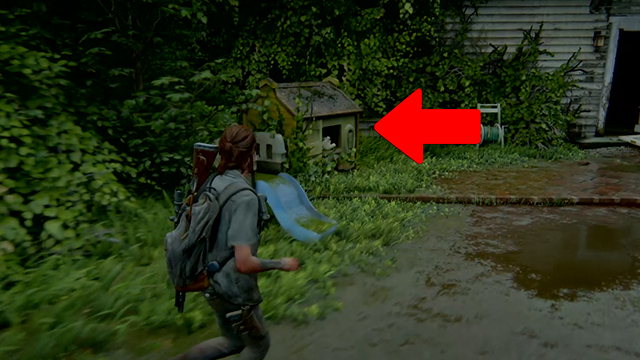
And right after hopping that fence, you’ll see that small kids playhouse outside of the big house. Go behind it.
The Brainstorm card is right in that small house.
The Last of Us 2 Trading Card Locations | Seattle Day 2 | Hillcrest | Reverb
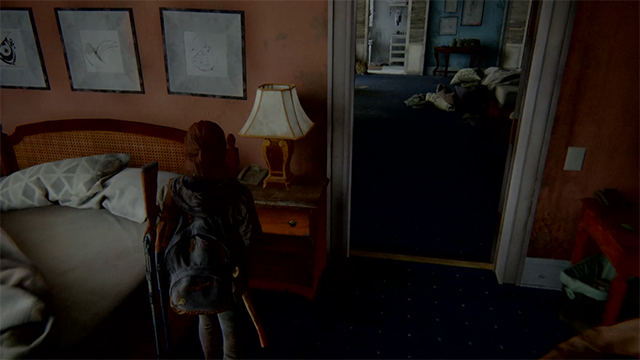
In the big, big fight after getting the bow and arrow, find the house in the above picture. Go inside on the second floor.
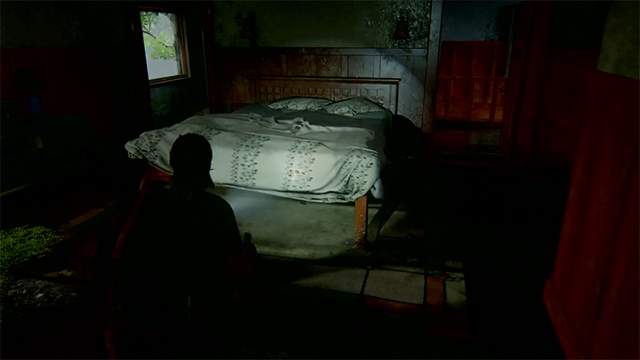
Find the bed in the above picture.
The Reverb card is under one those beds in that house.
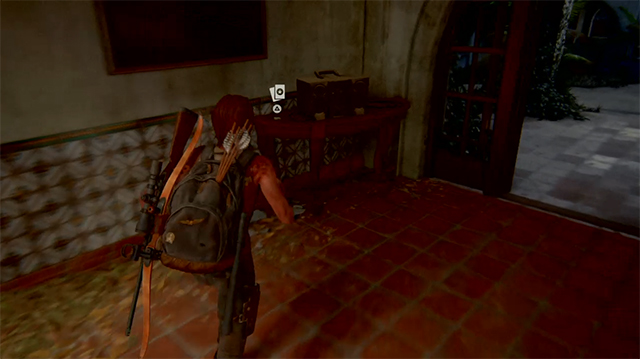
The Last of Us 2 Trading Card Locations | Seattle Day 2 | Finding Strings | The Austinger

After getting to the hotel and getting off the horse, go to the left side by the moving trailer with the red stripe. Climb on top of it to get to the other side of that vehicular barrier.
Find the above car and you will see the Austinger card in the back seat.
The Last of Us 2 Trading Card Locations | Seattle Day 2 | The Seraphites | Randy Styles
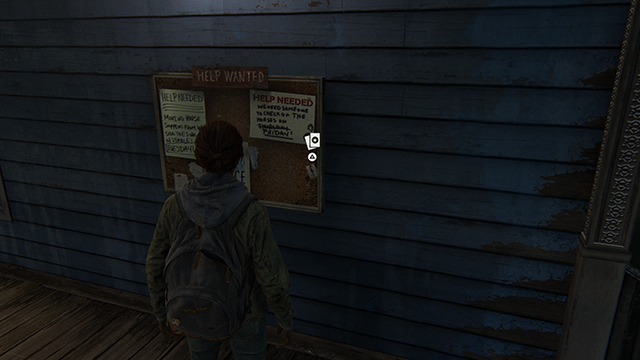
Right in the beginning of the chapter, you’ll have to mantle a fence and make your way into a legally safe 7-11.
Go inside and check the rack that the red arrow is pointing to.
You’ll find the Randy Styles card in there on that shelf.
The Last of Us 2 Trading Card Locations | Seattle Day 2 | The Seraphites | Shift
You will eventually get to the big open area you see in the above picture. And right behind Ellie in that photo is a hotel.
This is that hotel. Go inside.
In the back left, there is a ladder in the busted elevator shaft.
You need to use a brick or bottle and the nearby cord to solve the puzzle.
Smash the upper glass so you can toss the cable on that beam and use it as a swinging rope.
The Swift card is in the room you swing to.
The Last of Us 2 Trading Card Locations | Seattle Day 2 | The Seraphites | Star Sign
Go through the Route 5 path until you get to the “Do Not Block” sign. That is where the story wants to take you. Don’t go in there yet.
Go back until you see the apartments with the truck outside like you can see in the above picture. The front door to that place is locked so go to your right and crawl through the open crawlspace. Go up the stairs once inside and eventually you’ll get to where the occupants sleep. There are two doors at the top. You have to get in the room on your left but the door is locked.
So you have to break the glass window in the middle between the two rooms and jump to the outside of the room from there.

The Star Sign card is in a drawer in that apartment.
The Last of Us 2 Trading Card Locations | Seattle Day 2 | The Seraphites | Arch-Enemy
After the above vista, you will have to descend into a building.
At the bottom, you’ll see the above room with a locked door and two very, very breakable windows. Toss a brick at them and hop inside.
The Arch-Enemy card is in the desk in that locked room.
The Last of Us 2 Trading Card Locations | Seattle Day 2 | The Seraphites | Doppelganger
After meeting the Seraphites for the first time, you’ll have to open the door to hotel in the above picture.
Go up the stairs and then turn right twice to see the above table.
The Doppelganger card is on the ground near that table.
The Last of Us 2 Trading Card Locations | Seattle Day 2 | The Seraphites | Bhat M’Andarr

After dropping off the ladder in the above picture, you’ll see a bus stop. Go to it.
And once you’re at the bus stop, go up the stairs in the picture.
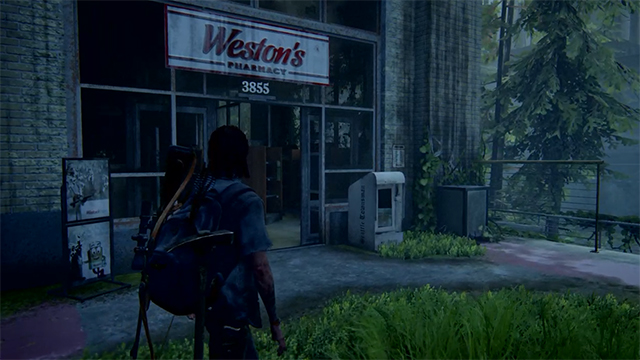
After those stairs, you’ll see Weston’s Pharmacy. Go inside.
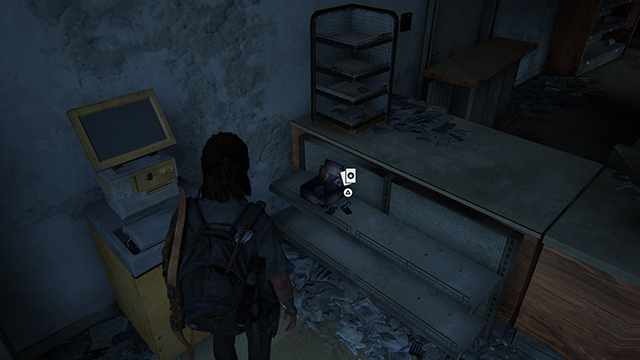
The Bhat M’Andarr trading card is right there in the front of the pharmacy.
The Last of Us 2 Trading Card Locations | Seattle Day 3 | Road to the Aquarium | Esquire
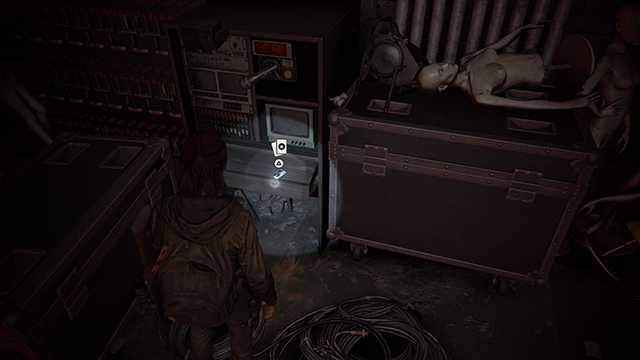
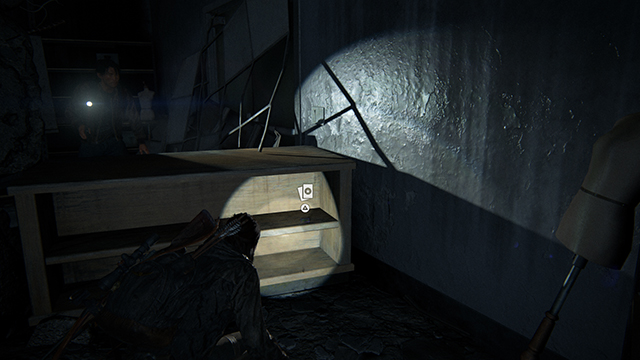
After waking up, make your way through the stage props until you get to the red curtains that you have to press the Triangle button on. Don’t do that just yet. The Esquire trading card is to the left of the red curtains on the stage on a table near some equipment.
The Last of Us 2 Trading Card Locations | Seattle Day 3 | Road to the Aquarium | Tormentra
The first workbench in Seattle Day 3 is in the beginning after you partner up with Jesse. Somewhat early in the level, Jesse will open up a door for you.
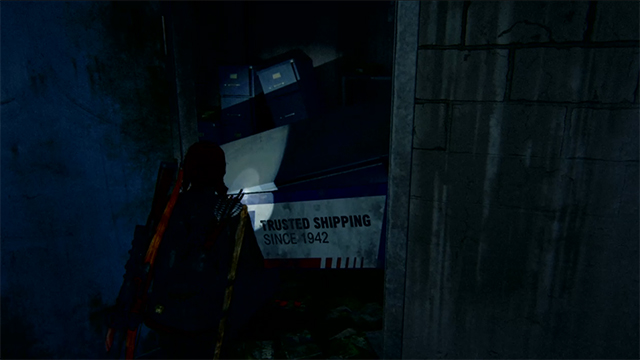
He will then go through a double blue door in the following him. Don’t follow him. Opposite that double blue door is a space you can crawl through a space that has a post office-like slogan that says “Trusted Shipping Since 1942.”
Once you crawl under that sign thing, you’ll come across a workbench in that room as well as the Tormentra card on the table.
The Last of Us 2 Trading Card Locations | Seattle Day 3 | Road to the Aquarium | Tanager
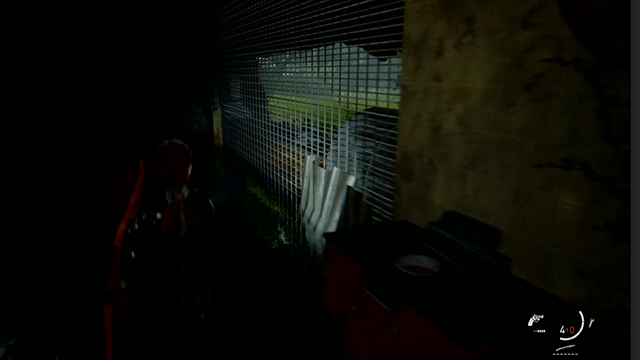
You’ll eventually make your way into a library with Jesse. Drop to the lowest part of the library and go to the farthest edge to see a gate like you see in the picture. Just turn around.
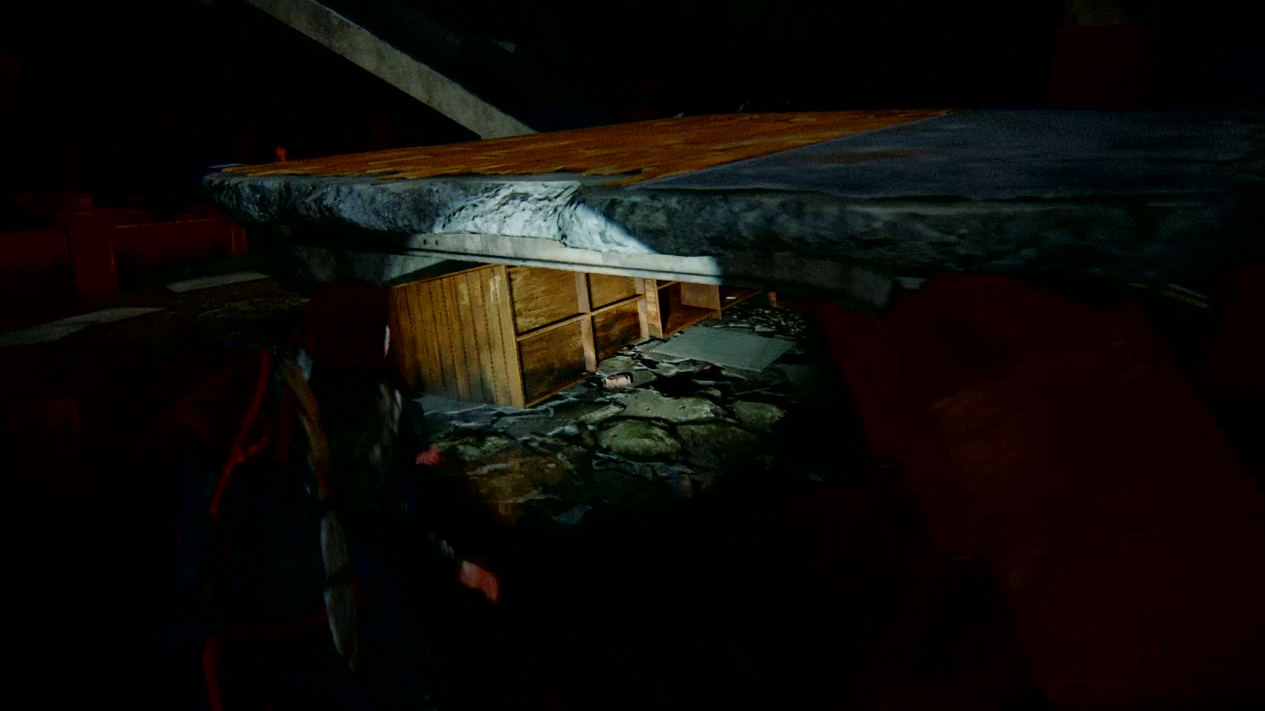
You’ll see this broken structure right near that fence. Crouch under and get into that small space.
After crouching under that slab, you’ll see the Tanager card.
The Last of Us 2 Trading Card Locations | Seattle Day 3 | Road to the Aquarium | Tatuaje
You’ll have to move a pipe (which is yellow in the picture) with Jesse in order to progress. But don’t do that just yet. Instead, crawl to that red arrow.
Instead, check the shelf on the side of the room that you don’t have to crawl through. The Tatuaje card is in there.
The Last of Us 2 Trading Card Locations | Seattle Day 3 | The Flooded City | Seff-L ‘ho’phad
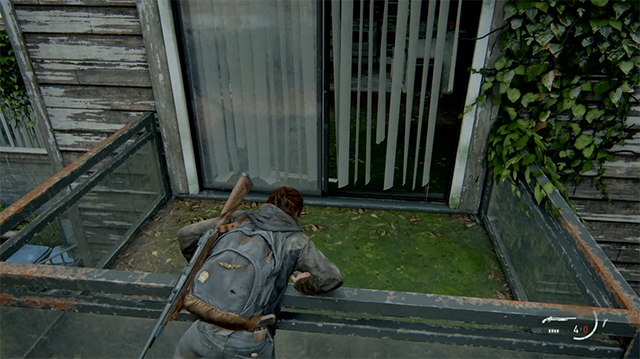
Once you get the boat in this chapter, you’ll eventually get to the area in the above picture where you need to get out and get the door open. Don’t do that just yet.
Instead, go back against the current and you’ll see a small room on the right side of the building as shown in the above picture.
Check the drawers in that room and you will see the Seff-L ‘ho’phad card.
The Last of Us 2 Trading Card Locations | Seattle Day 3 | The Flooded City | Khazakh Bright
After you kill the Bloater in the arcade, you’ll have to hold Triangle to open up the shutter to progress. Hop over the counter after opening the shutter and immediately turn right and you’ll see the Khazakh Bright card near the register.
The Last of Us 2 Trading Card Locations | Santa Barbara | Pushing Inland | CBB-73
You’ll eventually have to get into this house in the picture. And once you do, do not jump down to the lower level! Instead, investigate the kid’s room on the right.
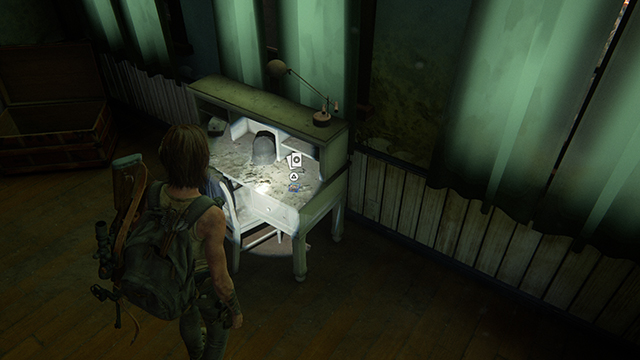
And in that kid’s room on the right, you’ll find the CBB-73 card on the desk.
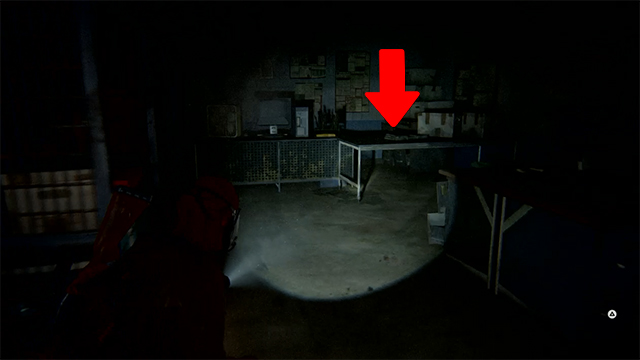
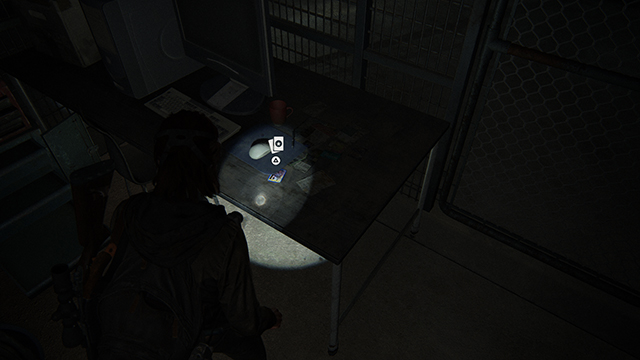
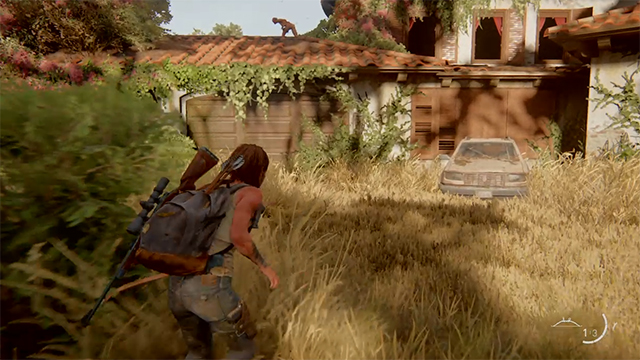
The Last of Us 2 Trading Card Locations | Santa Barbara | The Resort | Sparkthug
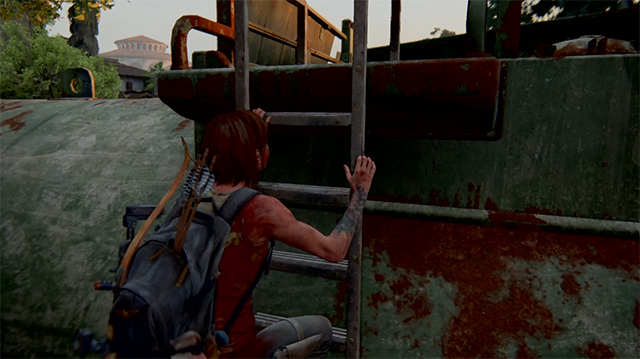
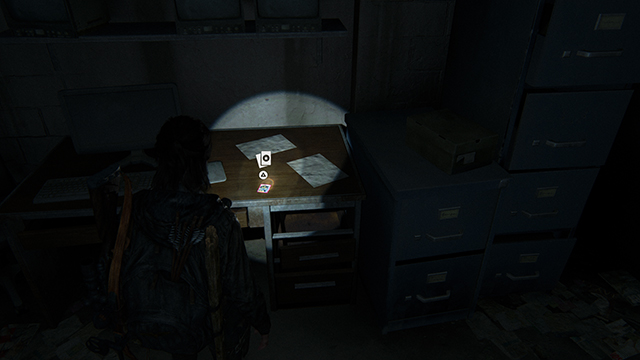
The last card in the game is in the big combat area that you get to by climbing the train tanker ladder in the picture.
Once you drop in, find the lit room centered in the picture. It’s by a locked gate and somewhat nearby that area’s workbench.
Go inside that room and immediately check the table to the right of the door you just walked through. The Sparkthug card is there by the boombox. Pick it up and grab your Master Set trophy.