Celeste is a beautiful, hard-as-nails 2D platformer with plenty of tricky collectibles to find. These include the Celeste Crystal Hearts. Below, we’ve listed the locations of each of the Celeste Blue Crystal Heart locations for all chapters. As a bonus, you’ll also discover what finding the Crystal Hearts will achieve and what they are. Be warned, however, they can be pretty tricky to find and collect.
What are the Celeste Crystal Hearts?
There is one Crystal Heart to be found on each level of Celeste. Each one is hidden expertly, however, often requiring the completion of puzzles to locate them. There are three colors of Celeste Crystal Hearts: Blue, Red, and Yellow. You will find one Blue Crystal Heart in each standard level of Celeste. There are seven Red Crystal Hearts to collect, which you unlock for completing B-Side stages. On top of that, there are eight Yellow Crystal Hearts to find, which you unlock upon completion of the C-Side Chapters.
Thankfully, however, you will only need to find seven of the eight Blue Crystal Hearts in Celeste. One of the Red and Yellow variants is given to you for completing each B-Side and C-Side stage, respectively. On top of this, to unlock the final eighth chapter of Celeste, you will need to fulfill these requirements:
- Standard A-Side Chapter 8: 4 Crystal Hearts of any color
- B-Side Chapter 8: 15 Crystal Hearts of any color
- C-Side Chapter 8: 23 Crystal Hearts of any color (All Crystal Hearts up to that point)
Including the Crystal Heart you will find on each of the three different Chapter 8s, there are 24 to collect in total. Below, you’ll find the exact locations and requirements to find the eight Blue Crystal Hearts in Celeste.
Celeste Crystal Heart Locations – Chapter 1
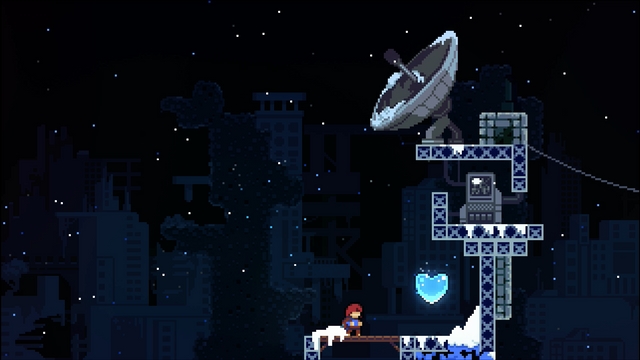
The Crystal Heart in Celeste Chapter 1 can only be found via a hidden path. During the second sub-chapter (Crossing), you must get to the second conveyer-belt platform and jump to the left as you are hurled into the air. Get to the left of the “Up” sign and you will find a hidden path. Eventually (after some simple enough challenges) you will find yourself at a computer and satellite. You will a bunch of different colored birds flying around the computer, corresponding with a color that the computer flashes. Each color of bird represents a different direction in which you should dash.
It’s up to you to dash in the correct order, as per the colors of the birds. Rather than bore you with all the details, however, you simply need to find the computer and input these directional dashes (in the order below) to unlock the Crystal Heart:
- Up
- Left
- Down-Right (diagonal)
- Up-Right (diagonal)
- Left
- Up-Left (diagonal)
Et voila. The first Blue Crystal Heart is yours.
Celeste Crystal Heart Locations – Chapter 2
To find the second Blue Crystal Heart in Celeste, you will need to exploit the game’s physics somewhat. Every time you enter into a new room in Celeste, your Dash recharge is reset. Essentially, you can endlessly dash by jumping and dashing up and down the edge of the screen.
You’ll find a fire during the first sub-chapter of Celeste Chapter 2. Once here, jump up and to the up-right out of the room, quickly dash to the up-left. Ensuring you don’t lose any momentum, keep repeating this trick until you reach the Crystal Heart at the top.
Celeste Crystal Heart Locations – Chapter 3
Once you have reached the second sub-chapter of Chapter 3 (Huge Mess), you will be able to find the third Crystal Heart. All you need to do is find and press a big button surrounded by towels. To find this, you have to take the lower path of the two available in the top-right of the screen after Mr. Oshiro asks you to help clean the place up. Keep on going and you’ll find the button.
Once you have pressed the large button, a thin stream of water will appear on the bottom right hand of the room. Dash up the stream of water and simply follow through the linear layout of the rooms from then on and you’ll find the third Crystal Heart. It should be underneath the library floor.
Celeste Crystal Heart Locations – Chapter 4
Right at the beginning of the second sub-chapter of Chapter 4 (Shrine), you will be able to find the Chapter’s Crystal Heart. You will see a guided platform. Cling to this and head leftwards so you don’t hit a wall. Once you have done this, move it back to the right of the screen and land. After landing, head to the lit up area to the right. Once inside the lit up area dive into the pool of water and swim to the bottom right-hand corner of the room before swimming to the right. You should now be in a secret room that contains a hidden collectible Strawberry.
Collect the Strawberry and smash through the breakable wall on the right of the screen. This will take you inside a tall room. Once here crouch atop the white block in the room. This will transport you to the background of the screen, where you can climb the tall room and find the fourth Crystal Heart.
Celeste Crystal Heart Locations – Chapter 5
The Crystal Heart of Chapter 5 is hidden in the Depths (sub-chapter 2). There is a statue in this level that you will need to climb on top of. Waiting for you there is a key. Once you’ve got the key, head to the room that’s underneath the statue on the right. Once inside, jump onto the red bubble and head right. Don’t unlock and open the door at the end of the room! Instead, jump onto a second bubble that’s waiting for you, head left, and dash up. You’ll see a platform which contains a third bubble that you need to jump onto and travel upwards. Here, you will find a secret path above the locked door mentioned earlier.
After going through a couple of rooms normally, you will want to head downwards in the third room and smash through the breakable floor. After you have done this, there will be a locked door. Now you can use your key. The room behind the locked door contains the Crystal Heart of Chapter 5.
Celeste Crystal Heart Locations – Chapter 6
Before you can find the Crystal Heart in Chapter 6, you will need to find some feathers. These can be found at the beginning of the third sub-chapter (Hollows). The first one is behind a wall that you need to break with an angry platform. The second requires you to use the first feather to fly in a north-east motion, before dashing down to smash through another breakable wall. The third feather has you use the second feather to fly upwards before climbing to find it. Once you have the third feather, fly to the left and enter the secret room.
Once inside the secret room, break through another wall and you will find a puzzle. There is a statue, six colored crystals, four torches, and three symbols. Remember the dash pattern you used to get the Crystal Heart in Chapter one? (Listed above) do this now. To light the following three torches, you need to repeat the following dash sequences:
- Torch Two: Up, Right, Down-Left, Up-Left, Right, Up-Right
- Torch Three: Down, Left, Up-Right, Down-Right, Left, Down-Left
- Torch Four: Down, Right, Up-Left, Down-Left, Right, Down-Right
Once the four torches are lit, the Chapter 6 Crystal Heart will appear above the statue.
Celeste Crystal Heart Locations – Chapter 7
As if finding the rest of the Crystal Hearts wasn’t difficult enough, the one hidden in Chapter 7 is the trickiest of them all. You have to find the six Jewels, one hidden within each of the six sub-chapters.
- Blue Jewel (0M): Right at the end of the last screen of sub-chapter one, you will find the first of the six Jewels. Bounce off of the last spring, dash twice over to the right (avoid the purple orb that sends you onto the next level) and climb to the top.
- Topaz Jewel (500M): After you have gone up the first conveyer-belt platform, head to the left at the intersection. At the next intersection, keep left again, before heading right after climbing the tall screen. Fall through a tiny gap in the bottom-right hand corner of the screen that follows another conveyer-belt. The Topaz Jewel is waiting at the end of a dangerous spiky room.
- Emerald Jewel (1000M): Get to the fifth screen of the sub-chapter. Take either the top-left or top-right exit. Heading top-left you will find a Strawberry, however, so we’d recommend heading that way. Simply use the Star Block to smash the breakable wall and then head up after the Strawberry to find the Jewel. Heading right will lead you to a disappearing platform eventually, stand on it and wait to fall into the chamber below. Complete the chamber and the Jewel is yours.
- Amber Jewel (1500M): In the seventh screen of the sub-chapter, you will see a broken wall underneath the exit to the eighth screen. Head through there and complete the room to find the Jewel.
- Ruby Jewel (2000M): Head into a gap above the pit of crystal spikes in the second room. Jump onto the secret platform hidden there. Jump over to the left-hand side of the screen from there. You will be in a room with a broken roof. Get to the broken section of the roof and find another secret platform. Head onto the platform, jump left, dash up and then left, dash up again right as you are past the wall. Head inside the hole there and the Jewel is yours.
- Pearl Jewel (2500M): Use the red bubble and head left, smashing through a wall. Then enter the red bubble in the screen behind the smashed wall and head right. You will smash through several walls this way before it stops to let you go up and find the Jewel in the revealed room.
Once you have all the Jewels, dash under a gap during Checkpoint 28 (it’ll be to your right). The seventh Crystal Heart will be waiting for you, making itself accessible as long as you have found the six Jewels listed above.
Celeste Crystal Heart Locations – Chapter 8
Simply finishing Chapter Eight will award you with the final Crystal Heart. Now, onto those B-Side and C-Side levels.