Players diving into Days Gone will find a plethora of things to do as they explore the open Oregon countryside as Deacon St. John. One of many items that players will come across are Nero Injectors. This guide will tell you everything you need to know about Nero Injectors in Days Gone, as well as everything you need to do to get your hands on more.
How to Get Nero Injectors in Days Gone
Before we dive too deeply into how you get more Nero Injectors, let’s talk a little bit about these important items. There are thirty Nero Injectors hidden around the open-world that makes up Days Gone. These items, when used, will boost one of the player’s base stats, including: Focus, Stamina, and Health. There are ten Nero Injectors for each stat, which means players will be able to upgrade their core skills a total of ten times throughout their journey in Days Gone.
Nero Injectors can mostly be found in two different types of locations you will visit in Days Gone. The first locations you can expect to find these consumables are in Nero Checkpoints. These also act as the game’s basic fast travel points, which you’ll probably spend quite a bit of time exploring and clearing out as you play through Days Gone. You can also find Nero Injectors in Nero Research Stations. These are a bit more difficult to find at times, as the Nero Checkpoints are mostly marked on the map for ease of access. Another thing to note is that Nero Injectors will often emit a red flashing light as well as make a noise when you are near them, so be sure to keep an ear out for that as well.
Nero Injector Locations in Days Gone
Now that you know what Nero Injectors are and how to get them, let’s dive a bit deeper and discuss the actual locations that you’ll visit along the way. Embedded in this article you’ll find a map that showcases each of the locations, which we’ve handily numbered to make it easier to locate them in order.
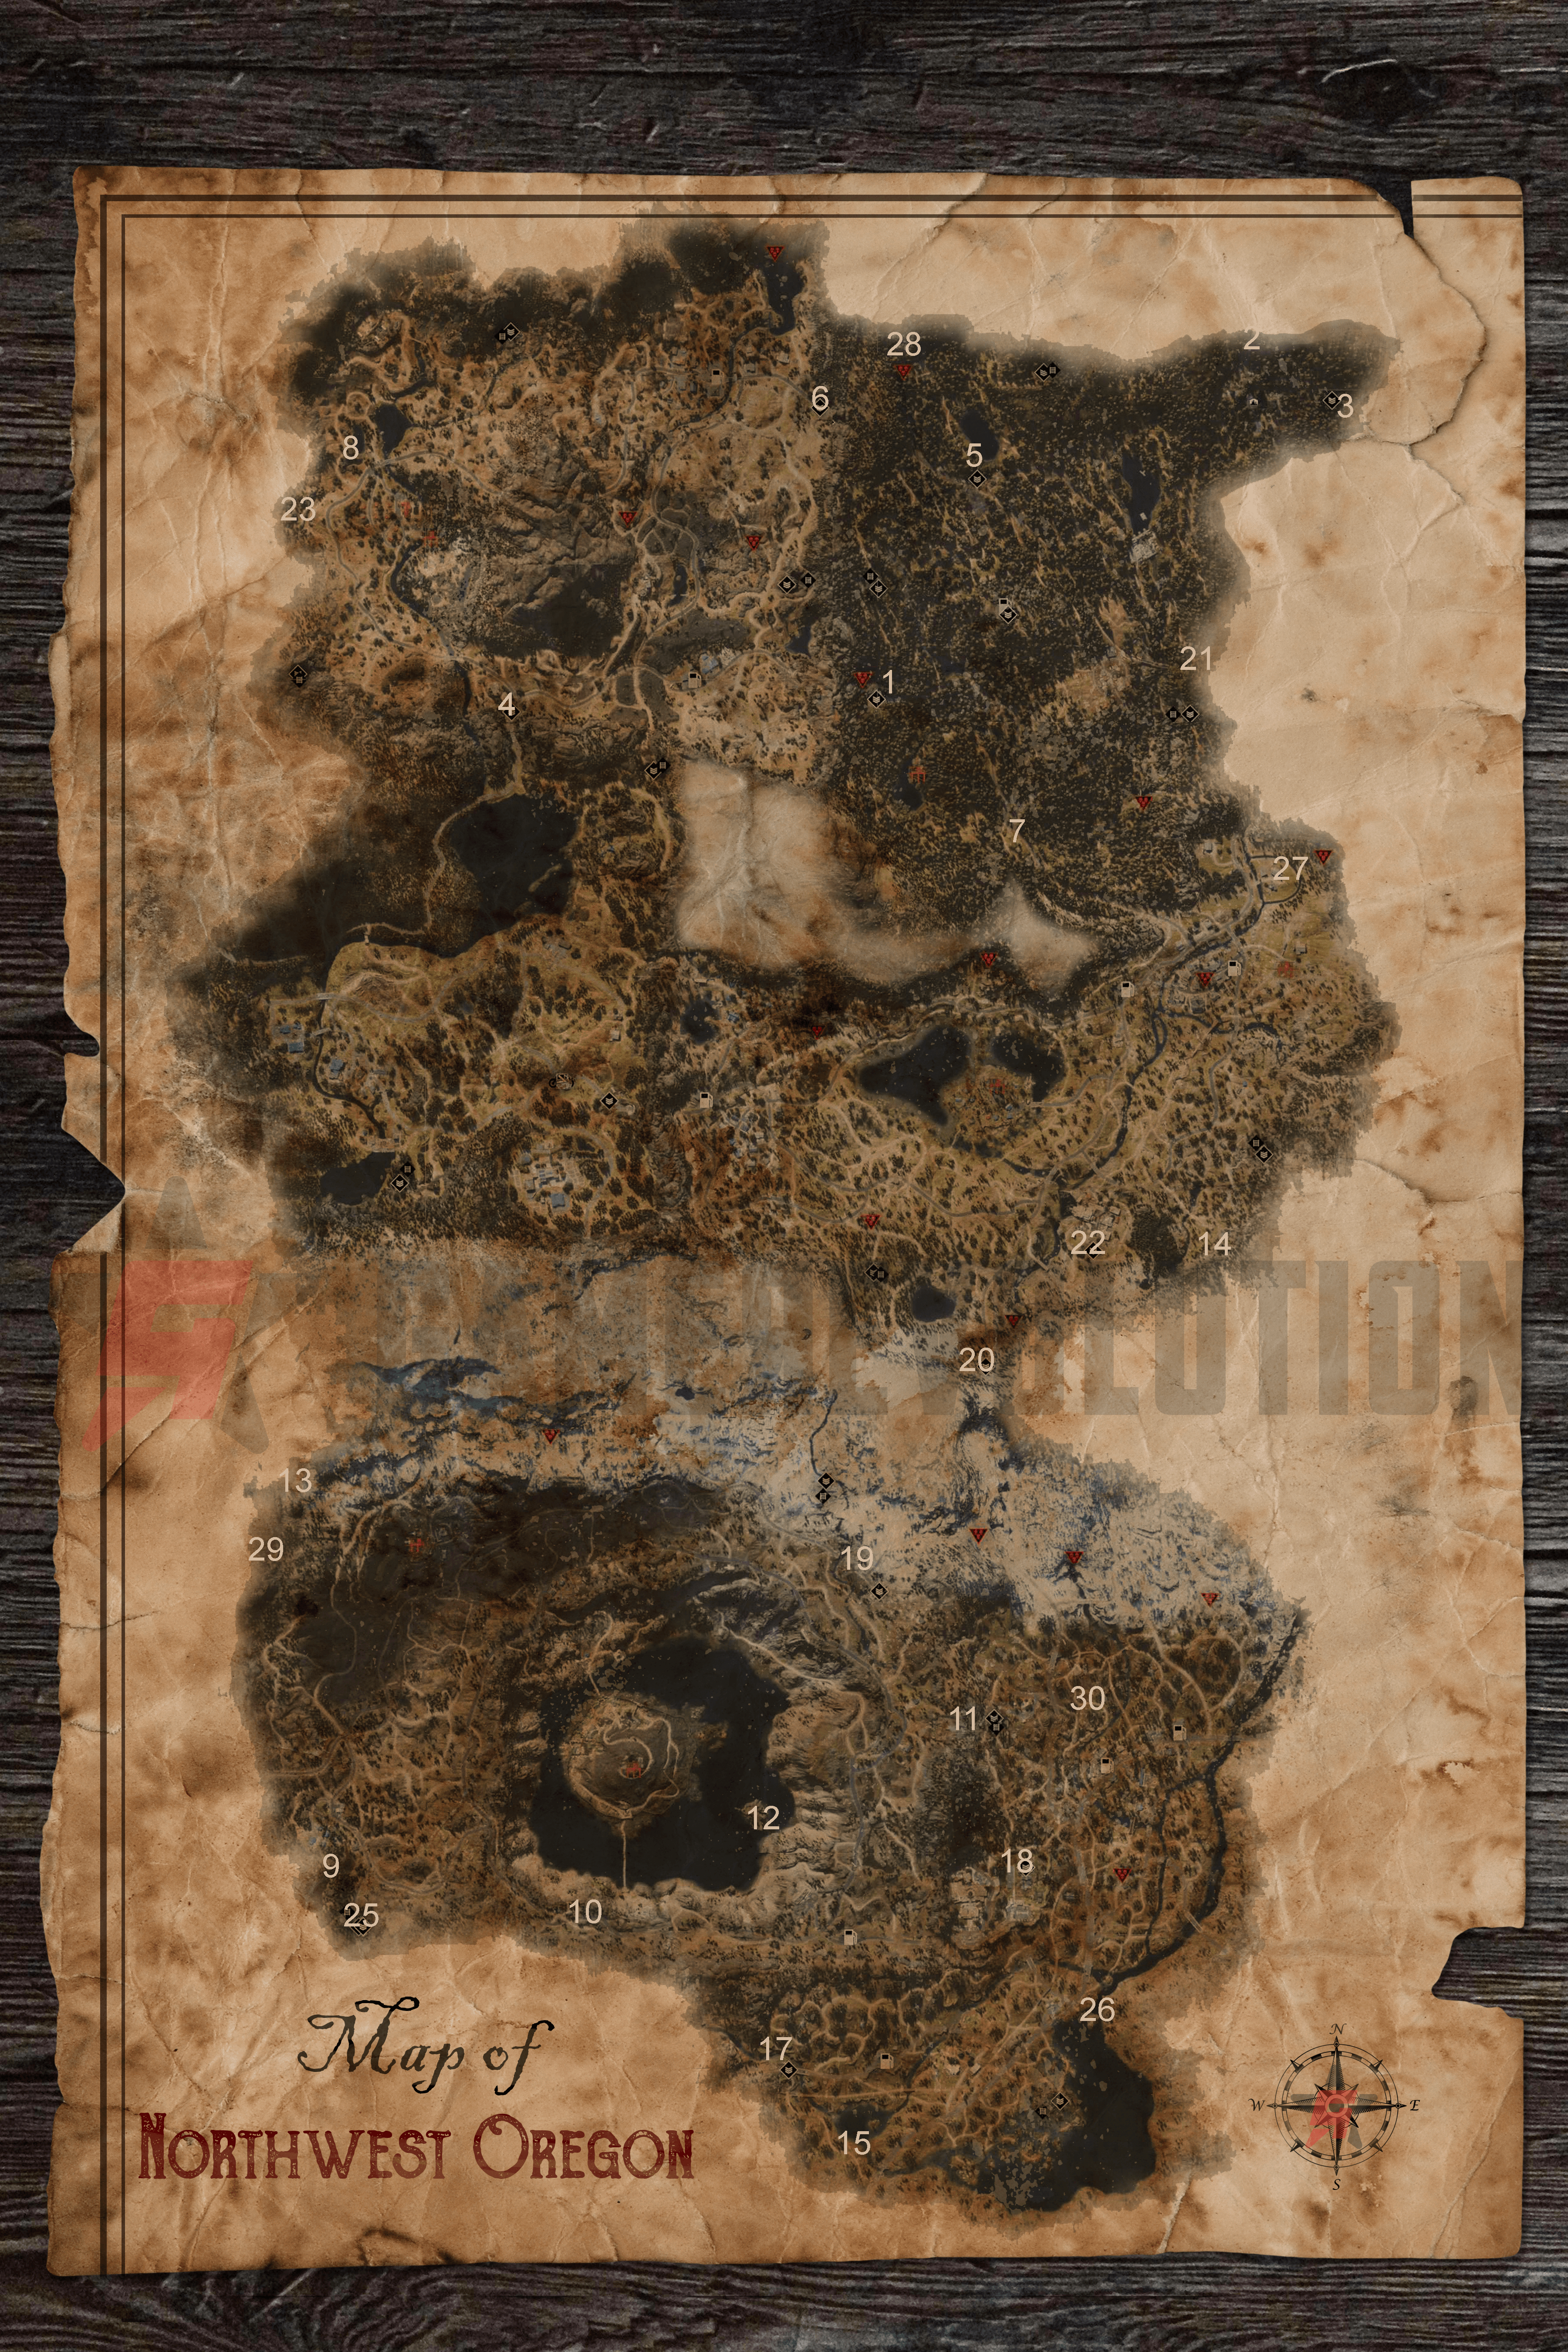
We’ve also included some additional details for each location below to help break it down even more. Note: you will need to use the corresponding locations on the map to more easily locate the injectors.
- Nero Injector #1 – The first Nero Injector can be found during the missing to find sterile bandages for Boozer. While playing through the mission you’ll come across the Little Bear Lake Nero Checkpoint, which you can search to claim your first Nero Injector.
- Nero Injector #2 – The next Nero Injector is found during a mission where you have to spy on the Nero Researcher. Make your way through the caves until you finish the mission. When you’re done, head back into the caves and look around to find this Nero Injector.
- Nero Injector #3 – Head to the Old Pioneer Cemetery Nero Checkpoint and search it to find this Nero Injector.
- Nero Injector #4 – Search the Iron Butte Pass Nero Checkpoint to find this injector.
- Nero Injector #5 – Travel to the Horse Lake Nero Checkpoint and search it to find this Nero Injector.
- Nero Injector #6 – Look for this injector at the Marion Forks Tunnel Nero Checkpoint.
- Nero Injector #7 – The next Nero Injector can be found at a Nero Research Station near the crashed chopper. You’ll need to jump a nearby ramp using your bike to reach it.
- Nero Injector #8 – The eighth injector can be found in a Nero Research Station close to the water. Look inside to find it and add it to your inventory.
- Nero Injector #9 – Finding the ninth injector will require players to search the Nero Research Station inside of Runners Cave. This is the same cave you visit during the bounty mission to find Anderson.
- Nero Injector #10 – Head to this location on the map and you’ll find a house with a Nero Injector inside.
- Nero Injector #11 – Look for a Nero Research Station inside of the cave that’s near the base with the wooden fence wrapped around it.
- Nero Injector #12 – Use the nearby ramp to jump the water and land on the small island. Explore the island here to find a new Nero Research Station where you can find this injector.
- Nero Injector #13 – The next injector on our list can be found in a Nero Research Station hidden inside of a cave. Head to the location we’ve marked on the map above and then look out for a ledge that you can climb up to. When you reach the ledge, look for a new path that should lead you to this research station.
- Nero Injector #14 – Use the ramp nearby to jump up to this Nero Research Station and claim this injector for yourself.
- Nero Injector #15 – We’re halfway there, now. To find this Nero Injector you’re going to need to look under the bridge for the Nero Research Station. Inside you’ll find the injector waiting to boost your stats.
- Nero Injector #16 – Next up you’ll need to look out for a tree trunk that is stretched out between two rocks. There’s a ramp nearby that you can use to jump to the top of the rocky cliff, where you’ll find a crashed-out helicopter as well as a Nero Research Station.
- Nero Injector #17 – Make your way to the Pillette Bridge Nero Checkpoint and search it to find this injector.
- Nero Injector #18 – Head over to the base at the Chemult Community Collect Nero Checkpoint and search it to add this Nero Injector to your inventory, unlocking yet another useful stat boost.
- Nero Injector #19 – This next injector can be found by traveling to the Volcanic Legacy Scenic Byway Nero Checkpoint and searching it. Grab the Nero Injector and use it to add another point to your stats.
- Nero Injector #20 – Finally, in the home stretch. The twentieth Nero Injector in Days Gone can be found by exploring the Santiam Tunnel Nero Checkpoint.
- Nero Injector #21 – Look out for this Nero Injector when visiting the railway bridge in this general area. There’s a Nero Research Station nearby that holds this injector.
- Nero Injector #22 – Travel to the Old Sawmill Nero Checkpoint and search it to find this injector.
- Nero Injector #23 – To find this next Nero Research Station you’ll need to head to the area we’ve marked on the map above. Once there, look out for a ramp that you can use to jump to another area. Once you’ve made the jump, look out for a ledge off to the right that you can climb up. This will lead you to a new path, that eventually leads to a crashed-out helicopter where this Nero Injector can be found in a research site.
- Nero Injector #24 – Head to the Rogue Tunnel Nero Checkpoint and explore it to add this injector to your collection.
- Nero Injector #25 – The twenty-fifth Nero Injector can be found by traveling to the Spruce Lake Nero Checkpoint and searching it.
- Nero Injector #26 – You’ll find two islands at the area we’ve marked above. To find this Nero Injector you will need to jump over to the first island using a nearby ramp. Once there, hop off your bike and then swim to the second island. Look for the Nero Research Station at the furthest end of the island.
- Nero Injector #27 – Head to this Nero Research Station and look for a screamer’s dead body to find this Nero Injector quite easily.
- Nero Injector #28 – This injector can be found inside of the White King Mine. While exploring you should come across a Nero Research Station with this injector inside.
- Nero Injector #29 – Look for the second to last Nero Injector in a small Nero Research Station on the mountainside at the location we’ve marked on the map above.
- Nero Injector #30 – The final Nero Injector can be found inside of a cave with a Nero Research Station tucked away at the location on the map above.
Now that you’ve managed to collect all of the Nero Injectors in Days Gone, you can easily upgrade your stats to make Deacon as strong as he can be. Be sure to use the map that we included at the top of this guide along with the descriptions featured here to find each Nero Injector more easily.