Having trouble with those puzzles in Zero Time Dilemma? Can’t figure out where to start? Well, if your prime concern is getting to the wild story, I’ve made a guide that should make it a breeze to get through each of the rooms. I’ve organized this guide to that you can make as few repeated trips to the same object in one room as possible. Sometimes, of course, it’s unavoidable.
Also, I’ll be providing tips at the top and links to explicit solutions which will be on the bottom. That way, you don’t have to completely give up on a puzzle in order to browse here. These are in order by C-Team, Q-Team, and D-Team; however, they are in no particular order from there.
On the wall is a recipe for making gelatin. It says you’ll need powder, water, and a mold.
Find a cabinet with a torso and iodine solution in it, and grab the iodine solution.
Find the box containing potatoes. Retrieve the knob for use later. Use the iodine solution on the potatoes. Now, you’ll see across the potatoes, they say, “DUDLLR.” On the inside of the box is written, “L-door -> <- R-door.”
Onto the large refrigerator where the left and right doors are locked and have symbols painted on them. Use the clues from the potato box to open each door. Solution. You’ll see that the symbols intersect over the middle glass panel, saying “LEFT HAND + DOLL.”
From the right side, retrieve the doll manual, which shows an opened-up warm doll and a closed-in cold doll. There is also a puzzle box, which you have to solve by rotating each surface to create a continuous pattern. My tip for starting this off is to rotate the box down slightly and match the two apple pieces. It’s fairly easy from there.
On the left side is a cold doll, indicated by being blue, and a handcuffed right arm.
There are two cabinets at the bottom of some shelving. Open the left cabinet to retrieve the powder and, if you wish, gawk at the leg. Go into your inventory and combine the powder, water, and mold as indicated on the instructions you saw earlier.
Now go to the microwave/flash freezer. You’ll see an indentation in the shape of a little man. Put the knob where the head would be to make it operational. Cool the mold to make a little gelatin man, and stuff it inside the indentation next to the knob. In return, you should receive a handcuff key. Next, put the doll inside the microwave and warm it. You’ll see that it turns red and has “1234” written across its chest.
Go back to the fridge and use the handcuff key to retrieve the right arm. Now, open the right cabinet of the pair where we got the powder. Use the handcuff key to release the left arm. When it plops down, you’ll see “529” written in a calculator font on the palm.
Microwave the right hand.
In order to open the door with the keypad, you’ll need to enter the code using the clues you found from the doll, the left hand, and the message on the refrigerator. Solution. And of course, push the right hand on the palm reader.
Infirmary – Hints
Go to the consultation desk, the one with the large monitor above it, and grab the luminol spray.
Use the luminol spray on the lockers, which reveals the combos for each locker. (This was not the hardest puzzle.) This is a focused guide, so just open two lockers. The middle locker contains a cube puzzle, which we’ll get to in a moment. The rightmost locker has a picture of a candle and a syringe, suggesting the latter goes inside the former.
Examine the cube puzzle in your inventory in order to solve it. What you need to do is arrange the pieces so they can easily form a cube with the golden patterning on the exterior. You swap pieces by dragging one over another. Solution. Your reward for completing this is a key card.
Look at the large CT scanner on one side of the room. Pick up the barcode reader sitting on the bed.
Insert the key card, and scan each team member.
The monitor above the consultation desk should reveal three barcoded images. Tap on it with the barcode reader and swipe it across the entire length of the images. The drawer underneath the monitor will unlock. In it are a bottle of ink and a lug wrench.
On the treatment bed in another corner is a syringe for you to grab.
You’ll note a poster of a woman holding a candle. Use the items you obtained and the clue from that picture to reveal what’s hiding behind it. Solution.
Look for the lab coat hanging on the wall, and grab the stethoscope. Use the stethoscope to open the safe dial. Like most locks, you’ll need to turn the dial clockwise, counter-clockwise, and then clockwise again. They’re also nice enough to provide a visual indicator of when a hammer drops in case you are hearing impaired. Solution.
At this point, you’ll have already finished the puzzle room, but the game presents a new puzzle in guessing which container holds the antidote. Although the antidote is in a different container each time you play this sequence, meaning I can’t give you the answer, Carlos, Akane, and Junpei will each test the same ones every time you play. They’ll be mentioned twice, so write them down at least one of those times. Here’s a handy chart as well. Based on who claims to have a numb tongue, you can solve this puzzle easily. Solution.
| A | B | C | D | E | F | G | H | |
| Carlos | No | No | No | No | Yes | Yes | Yes | Yes |
| Junpei | No | No | Yes | Yes | No | No | Yes | Yes |
| Akane | No | Yes | No | Yes | No | Yes | No | Yes |
Control Room – Hints
There is a speaker above the green and red pedestals. Inspect it to reveal a note that looks like the small monitors around the security panels. In the upper left-hand corner, going down, it shows, “9 2 13.”
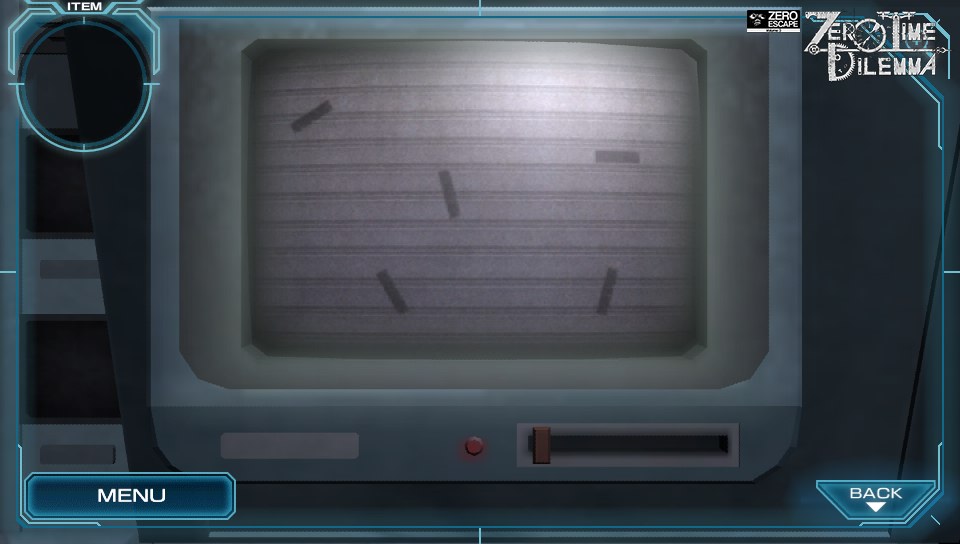
Looking at the large security monitor in the upper right, you’ll see some lines. Tap the slider to zoom out, revealing multiple lines going in different directions. Use this image – document it however you feel works best – to adjust the knobs on the wall to the left. Solution. This should open an item drawer containing small battery parts and a similar note to the last one. Down the middle should read, “1 8 6 12.” Note that the one is European and looks like a seven to American eyes.
Take a look at the chart above the set of ten lockers. Down the left, it shows “4 1 2 5 3” and down the right, “III I V IV II.” Note that the bottom corner of it seems curled. Tap it to retrieve the sunglasses.
Combine the sunglasses with the small battery parts and examine to use. This has three modes, but we only need to look at one right now, A Mode. You’ll see a chart with a similar orientation to the one we just looked at. Without any labeling on the sides, however, it shows connections between each point: the first on the left is connected to the third on the right, left second to the right fifth, left third to the right first, left fourth to the right second, and left fifth to the right fourth.
Head to the switchboard, where you must connect the wires on the left to the points on the right. First, grab the note, which shows more monitors with ”3 10 7” in the upper left, going left to right. Now, use the chart from the wall and the A Mode diagram to connect the wires appropriately. Solution.
Connecting the wires correctly should open the door in the upper left large security monitor. Here you’ll see compass directions written in colored ink. (Looking here before would’ve shown only two colors cut off.) The coordinates are as follows: red SE, blue N, green E, pink SW. You’ll want to put these directions into all four pedestals around the room. The order doesn’t matter.
Once you do, a black pedestal will pop up in the middle of the room, and the canisters in the bottom right security monitor will light up. On the first row, the first, third, fourth, and sixth will light up. On the second row, it’ll be the second, third, fifth, and sixth.
Light up the buttons on the radiation meter using this solution. This should open a locker containing another note, showing “5 4 11 14” going from left to right along the bottom left. You’ll also receive an ear speaker. Combine the ear speaker with the sunglasses, and examine to check out B-Mode. This mode shows numbers against various backgrounds and plays a sound corresponding to each.
If you take a look at the bottom left security monitor, you’ll see a claw machine. Pushing the directional buttons moves the claw and also makes vibrant noises. If you push the button that sends the claw down after entering the wrong combination, you’ll fail. Use the B-Mode clues and the clues you just learned to enter the combo, and send the claw down. Note that because each sound has a word that displays with it, hearing impaired folks should be able to solve it. Solution.
The claw will push a button that turns on all the peripheral monitors, revealing letters on each. “B E R” down the upper left, “S E F E” across the bottom left, “B D T I” down the middle, and “T Y E” across the upper right. This obviously resembles the cards you have.
Examine the sunglasses one last time and go into C-Mode. Enter in the code using the notes you collected and the letters on the monitors. Solution. This reveals a video of Zero adjust the pedestals among other things. Notably, it shows these directions: Green N, Red NE, Blue W, Pink S, Black NW.
Enter these coordinates into the pedestals, and put the plug into the new podium that arises from the floor.
Rec Room – Hints
Look at the bar counter. You’ll get a small wooden box on the left. On the right, there’s an ashtray, some Sunset 24 cigarettes, and a box of matches for you to grab. On the shelves behind the bar and to the right, there’s a bottle of water for you, too. Meanwhile, on the large set of shelves, there’s a distinct bottle of SADMAN 570, which Carlos will reminisce about.
Focus on the fireplace now. On the mantle is a bottle of Oil 130ml. To the right is a suit of armor that will relinquish its fire hook when examined. As for the fireplace itself, it’s time to start a fire. Use the matches, throw the box in, use water to put it out, and the fire hook can retrieve the coin left over.
To the right of the stand that says, “Collect 5 coins,” which we don’t care about yet, there’s a little door on the floor. Use the fire hook to open it. Get the wooden hammer, and check out what’s written on the door. It’s 5564C written in a calculator font, but the C is crossed out.
Move along to the coffee table. Grab the chess rule book and study it for a moment. If you are already familiar with how chess pieces play, then you’ll learn nothing new here. Then, there is a jar of JAM 100% in front of that. Finally, there’s a chess board that appears to be locked closed. Open it using your items and clues, so you can examine the clue illustrated on the chess board. If you tap to examine it enough times, it’ll be pretty apparent what you need to do. Solution.
As a reward, you should receive a cylinder. Examining it allows you to put in a code. Use the chess board and the rules (whether known or recently learned) to open it. Solution. You’ll get a coin, and a card that says, “05 28 21 26.”
Check out the suit of armor near the door to receive a card with a letter chart. Venture on towards the roulette table now. If you take a look at the betting area, you’ll see some numbers circled. On the roulette wheel itself is space to enter in some letters. Using the card from the cylinder, the letter chart, and the numbers on the betting area, you should be able to enter the solution, which detaches the wheel entirely and gives you a coin. Solution.
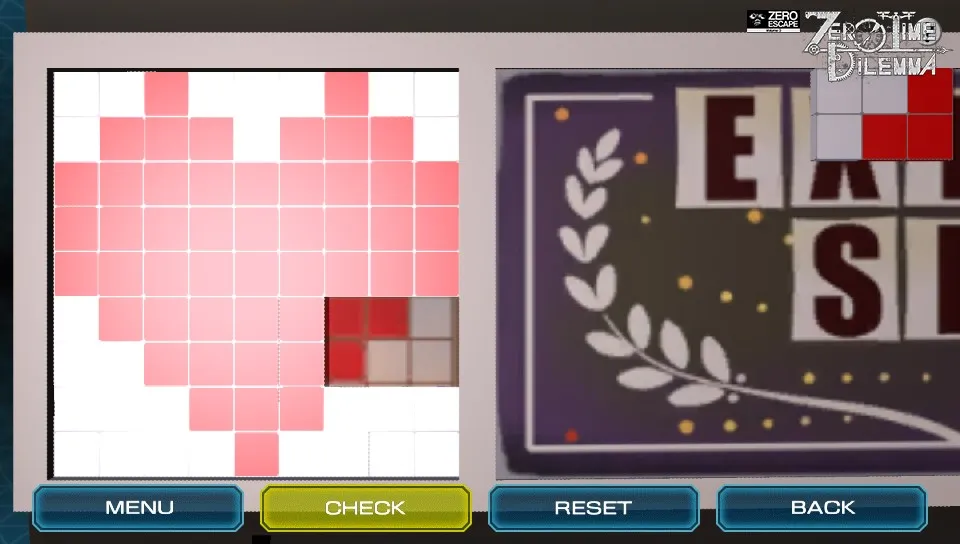
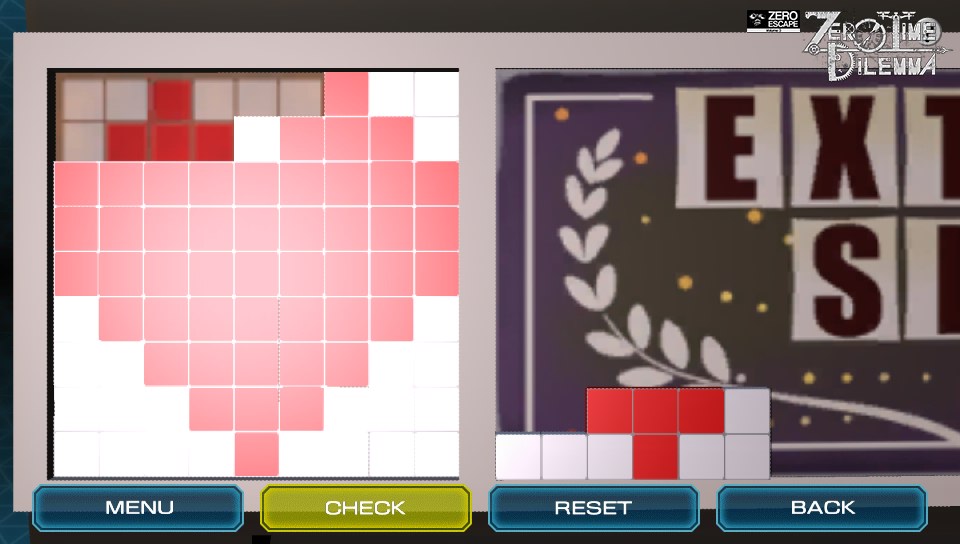
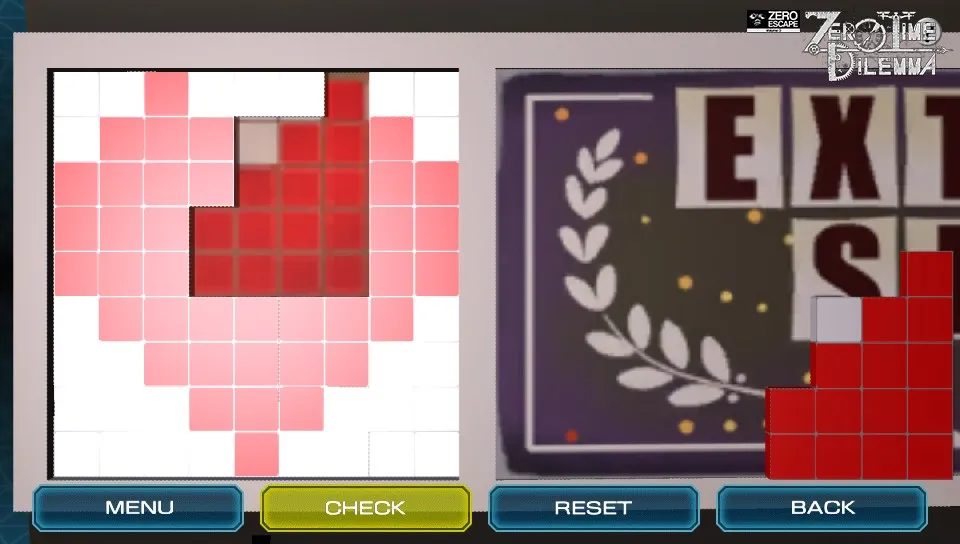
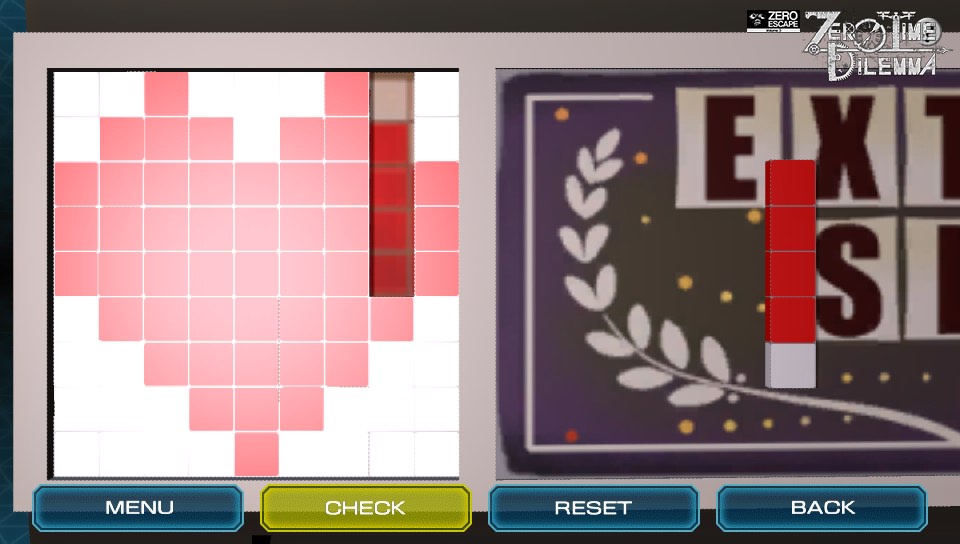
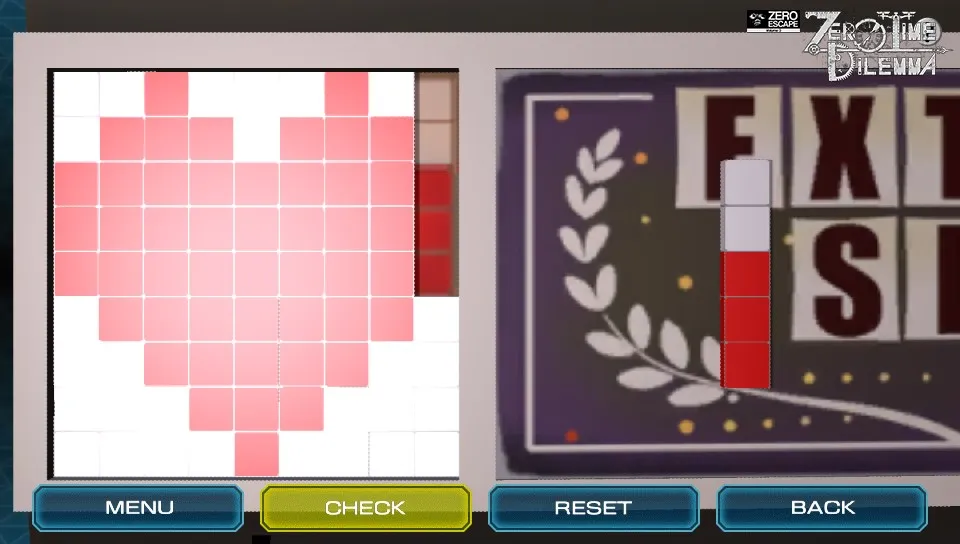
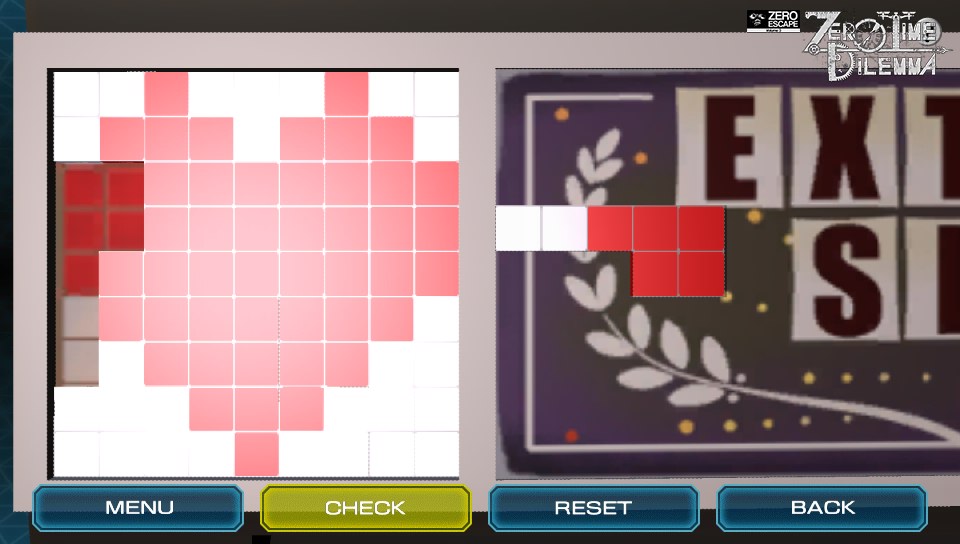
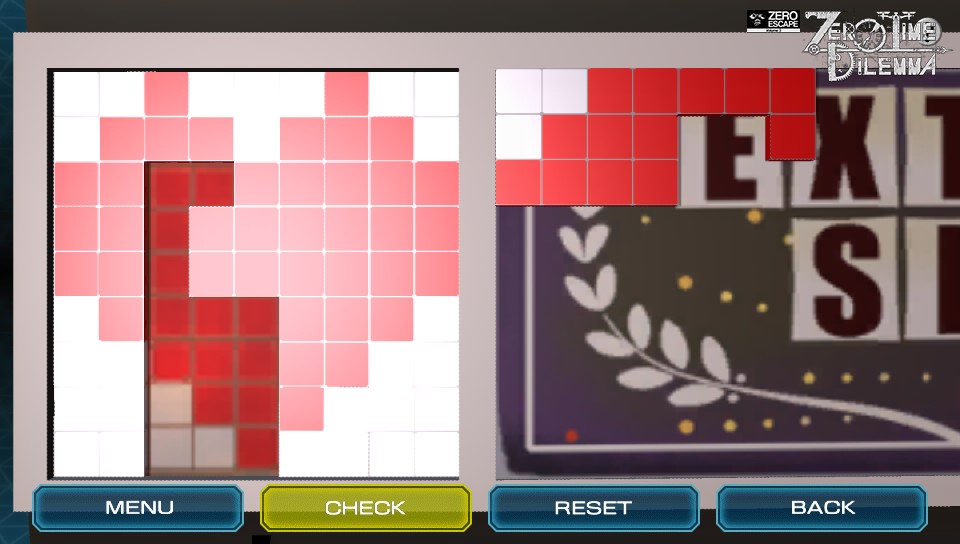
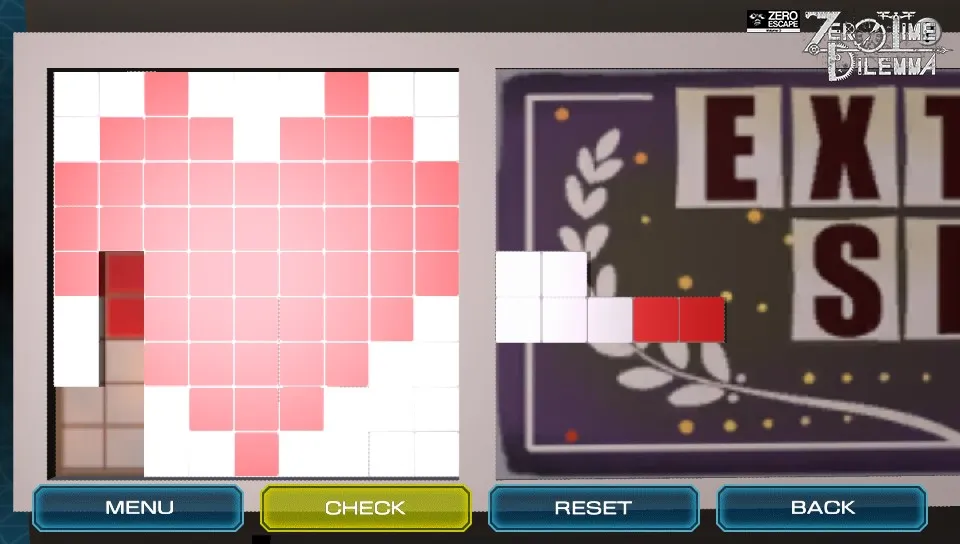
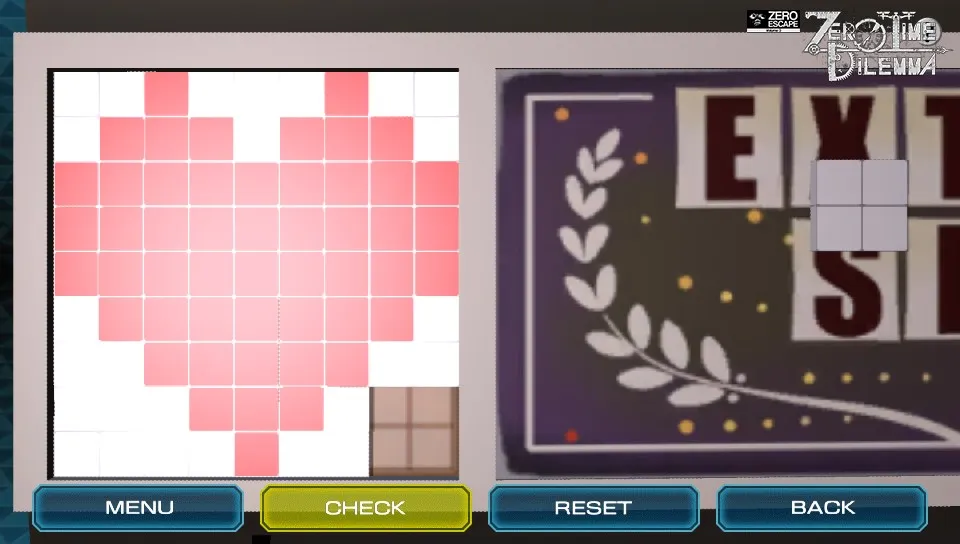
You can put the roulette wheel in the top of the slot machine to turn it on. Also take note that the Odds = 35%. Move your focus down to the actual slot wheels and start them spinning. Unless you received a copy of the game made by someone who hates you, you should get all 7’s. The reward is a bunch of puzzle pieces. Keep the puzzle pieces in hand and move down to the heart picture on the bottom of the slot machine. Arrange the pieces so they match the heart picture to get another coin and a card calendar. Solution.
Put the card calendar into the slot on the jukebox right next to the slot machine, labeled JUKE 803. The dice will pop out and fall on the floor. Grab them.
Now go look at the card table. Knock down the card tower, and you’ll see the four kings have been torn and a strange formula: A 8 3 – 10 Q Q 9 + 9 4 Q 5 8 J. Insert the dice into the slots nearby, and arrange them so they show the proper three digit code. You’ll need the card calendar, this formula, and the various clues from around the room. Solution. Your reward is the last coin!
Put all the coins in the stand and push the red button.
Although you will have solved the room by now, the decision in this room is a bit of a puzzle. The only thing you can do is throw the dice. So just keep this in mind: If there’s a possibility, however unlikely, that something could happen, you should keep trying until it does. Your odds are better than reality.
Power Room – Hints
Getting to this fragment is a bit of a puzzle in and of itself, so here are some tips. If you followed the instructions on Carlos’ coaster during the vote at 13:30, you won’t be able to access this fragment. You need to execute one team in particular to make this fragment appear for C-Team. You can’t get a Platinum Trophy on Vita if you don’t try all the combos anyway, and there are two other scenes for other teams locked behind these executions.
Behind you when you start seeking a way out is a box of matches on the floor. Pick those up. Examine the power distribution panel (green machine), and tap the slider to turn it on. Because this room has two of many things, please excuse my directions. Moving left from the power distribution panel, you’ll find a locker with a glass door. Open it and get the steel mold.
Then, tap the switch next to it, turn it, and open the locker on the bottom. This contains another puzzle box where you need to rotate all the surfaces to align somehow. My tip for starting this, as soon as you start the puzzle, try to get three surfaces which make up the upper left hand corner to match. Everything from these is a piece of cake. Your reward is two sink plugs.
Go back to the power distribution panel and turn the switch on the right to send the power to the other side of the room. This time, you’ll be heading to the right. However, before you do, stop at the main gas valve (red, right next to it) and turn it on. Now, go to the locker that’s on the other side of the room, again going right from the power distribution panel, and open it to get the freezing extinguisher.
Turn the switch on this locker, and open the lower locker to get the block of tin. To the right of this locker is a gas valve. Turn this on. Slide on over to the furnace to the right of the gas valve, and light it with the matches. Go to the other side of the room to the gas valve to the left of the left lockers, and turn that on.
The furnace to the left of the left gas valve operates differently. You’ll need to put the steel mold and tin in the drawer sticking out before it’ll let you light it with the matches. Aside from turning it on, you’ll get a key from the door on the bottom of the furnace.
Head over to the blue water valve, which is now thawed out completely, and turn it on. The next set of instructions are symmetrical on each side. Going left from the water valve, on the floor, there will be a drain outlet with the drain cover sitting outside it. Tap it to put the drain cover in. Move onto the sink to the left of that, put a drain plug in, and turn on the sink. To the right of the water valve, do the exact same thing.
This will cause the channel in the middle of the room to fill with water. You’ll find a power lever to the left of the furnace where you made the key. Insert the key and pull the lever. This will cause the reactor turbine shields to come down. Next, to the left of the door to the room is a power switch. Turn it to send electricity through the water channel and power on the main console.
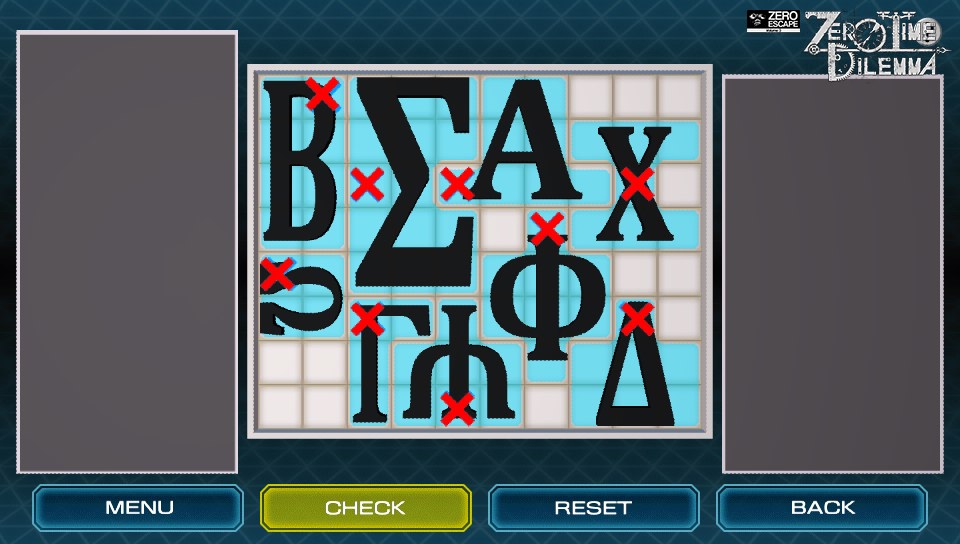
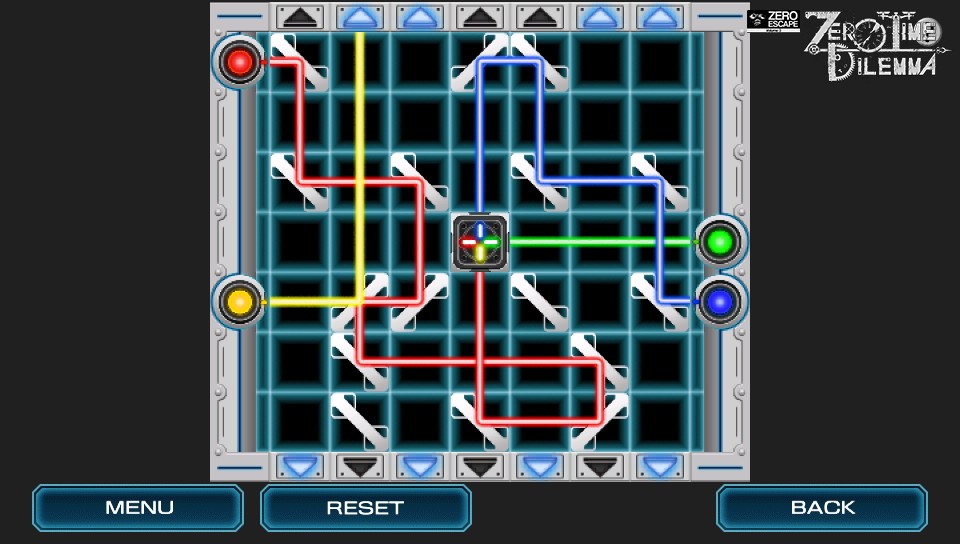
The console monitor contains a puzzle. Here, you’ll need to arrange various Greek letters to all fit in the space in the middle. Solution. Doing so turns the monitor to the left of the console on. For this puzzle, you’ll need to adjust the sliders so that you can reflect each color light into the appropriate slot in the center.
This puzzle will take a bit of experimentation. From my own experience, I suggest trying to align the yellow laser first, since it’s the most complicated. Try following the yellow end in the center down and go from there until you reach the laser on the left. Once this is done, adjust the sliders for the other lasers, making sure the yellow laser’s path and the directions of its mirrors stay exactly the same. Solution.
At this point, shit will start going down. Try to turn off the power switch to the water channel and fail. Use the freezing extinguisher to stop the current and start peeling back the onion on this wild story.
Pantry – Puzzle Solutions
Refrigerator doors:
Left door: Down Up Down Left Left Right
Right door: Right Left Left Down Up Down
Door code: LEFT HAND + DOLL = 1234 + 529 but the left hand was upside down, so really it’s 1234 + 625 = 1859.
Infirmary – Puzzle Solutions
Cube puzzle:
Swap the middle left piece for the middle right
Swap the bottom right piece for the top right
Swap the bottom left piece for the top left
Swap the middle right piece for the top right piece
Poster: Combine the ink and the syringe. Inject the ink into the candle. This reveals two new candle shapes. Inject ink into each of them. Back away, and tap on the top of the poster to look at the corners. Use the lug wrench to undo the nuts up top. Do the same for the bottom.
Safe dial: 15-7-12
Antidote puzzle: Use the list below to determine which container holds the antidote. You’ll need to note whose tongues felt numb in order to use this list.
Nobody: A
Just Akane: B
Just Junpei: C
Junpei and Akane: D
Just Carlos: E
Carlos and Akane: F
Carlos and Junpei: G
All three: H
Control Room – Puzzle Solutions
Knobs:
Switchboard: Using the actual labels on each node, the wires should be connected as follows.
4 – V
1 – II
2 – III
5 – I
3 – IV
Claw machine: The solution is right, down, left, down, followed by the claw.
Sunglasses code: BETESTEDBYFIRE
Rec Room – Puzzle Solutions
Chessboard: Hit the C with the hammer.
Cylinder: Rook, Bishop, King
Roulette wheel: SPIN
Heart puzzle: Unlike other arrangement puzzles you’ll see later, these pieces all match up seamlessly, which makes screencapping the final solution worthless. Instead, I’ve created a gallery that clearly shows which pieces go where by taking them out one by one. This way, I don’t have to open up a graphics program.
Dice code: This one uses a number of clues, and I highlighted all the important ones. According to the card calendar, every card but the kings correspond with a month. And the first letter of each month is made very obvious. So if you use the card formula you’ll get these incremental steps:
A 8 3 – 10 Q Q 9 + 9 4 Q 5 8 J
=January August March – October December December September + September April December May August November
=JAM – ODDS + SADMAN
=100 – 35 + 570
=635
Power Room – Puzzle Solutions
Greek letters:
Laser puzzle: Because getting all the lasers in place solves the puzzle, I took a snapshot before it is solved. Just move the second column from the left up one square to finish.
Pod Room – Hints
Tap on the dartboard-like target at the end of the room to zoom in, and then tap on the hammer behind the glass door to focus on it. At this point, I’ll admit to not liking this room because you’ll be doing escalating versions of the same puzzle eight times. Tap on the top puzzle to solve it. The goal is to slide the red piece all the way inside the square. Then do the same for the bottom. Solution. Retrieve the hammer, and zoom out completely.
On the floor, you should find a note, which shows the word, “Strike,” circled in red. This is a clue for what you’ll now need to do with the hammer. Strike away until you expose a new glass case, containing the large driver. Solution. Solve the top and bottom puzzles to obtain it. Solution. Zoom out completely, and continue striking until you can get the gear piece from the weird container on the wall. Solution. Combine this with the large driver.
Zoom in on the target again, and zoom in on the glass case underneath it. Solve the left and right puzzles to get a note, showing Zero holding some darts, saying, “Become me.” Solution. Tap on the hole for the large driver to start the next puzzle. Basically, following the note, you need to make the number, 0, appear in the center. Turning to a red number adds its value, while turning to blue subtracts it. And you fail the puzzle if the number goes below zero. However, if you already solved either of the inner circles, you won’t be set back to do them again. Solution.
A podium should lift out of the floor. Insert the large driver to rotate the room back to “normal,” which in this case means aligning the green lines. Solution. This will reveal a glass case, containing a shotgun, with even more puzzles on the sides. Solution.
Use the shotgun on the glass covering the red POD button. Tap the button.
Library – Hints
The desk is remarkably bereft of useful items. Tap on the drawers to get the human mark key. Use this key on the safe by the door. Inside the safe are Part D, the star mark key, a handgun, and the birdman card, bearing the letters, “HFGY.”
Use the star mark key to open the safe to the right of the fireplace. Inside here are Part C, the Moon card (“NIL”), and Note 1, reading, “S-02-16.”
Go upstairs. On the floor all by its lonesome is a paper, Polovtsian Secret 1. Onto the moon safe on the other side, you’ll find a Polovtsian figure with its right hand over its chest. Use this to enter the code. Solution. Here, you’ll get Part E, a crossbow, and the Sun card, reading, “NIL,” too.
Back downstairs is the Sun safe. The figure on this safe is crouching down with its hands on its kneese. Enter the code for this safe based on this clue. Solution. Obtain Part F. There is also a lever inside here that will activate the chair near the desk.
Sit in the chair and enter the index code from Note 1. Here, you’ll receive a note, titled Polovtsian Secret 2. Now, study the Polovtsian figures on the end of the desk. You’ll see, going from left to right, the first figure has its left hand raised, the second has its right hand raised, the third has its left hand extended outwards, and the last has its left hand raised.
On the reading chair to the right of a cylinder with the birdman figure on it. Enter the code using the birdman card, Polovtsian Secret 2, and the figures on the desk. Solution. From here, you’ll get Part B and Note 2. This note says, going downwards, “Bullet for C-Team, Arrow for Q-Team, Acid for D-Team.” (Gallows humor.)
Take a look at the portraits above the fireplace. Tap with either weapon to start the puzzle. You’ll need to use the correct weapon on the correct characters in order to reveal what’s hidden behind Q’s portrait. If you mess up, the portraits reset themselves using movie magic. Solution. Get the grenade launcher.
Tap on the flower safe with the grenade launcher to begin some scenes where you blow it up completely. Once blasted, tap on it again to view the contents. You’ll find three dolls with their left hands extended outward, Part A, and Note 3, “J-05-03.”
Using the dolls and Note 3, you should be able to enter the code into the chair and obtain the blueprint for building the giant safe key. Solution. It’s worth mentioning, though, that it’s really easy to figure out how to build this key without the blueprint. You don’t need it unless you’re really having trouble. Tap on the safe’s keyhole with the impressive key to open it.
Just a note on deciding who to kill at the end of this fragment: It’s apparent that there are four possibilities but only two people other than Q in the room. The pacifist route is possible by typing, “NONE” or “NO ONE.” As for the fourth solution, well, you’ll need to learn someone’s name.
Biolab – Hints
Behind you should be the clean bench. Grab the green and pink liquid beakers. Then move onto the tool shelves. Tap on the sheet of paper sitting on the box in the middle, which is the centrifuge manual. Shift over to the desk that had the computer, the one which told you to slash the pig’s stomach. Examine the DNA model and get the piece that breaks off of it.
Move right to the centrifuge, and use the DNA model piece to get the cover off. Put in the green liquid beaker to get blue and yellow test tubes. Put in the pink to get red and white test tubes.
In the corner of the room is a sink. Look inside it to get the knife. Back to the chair in front of the desk, slash the pig cushion to obtain the file on Fanatic Bio R, the microscope lens, and the power cord. Put the microscope lens on the microscope sitting on the desk, and examine each test tube. After you back out of each, one of the team members will comment on the numbers in each cell grouping. Take note of these.
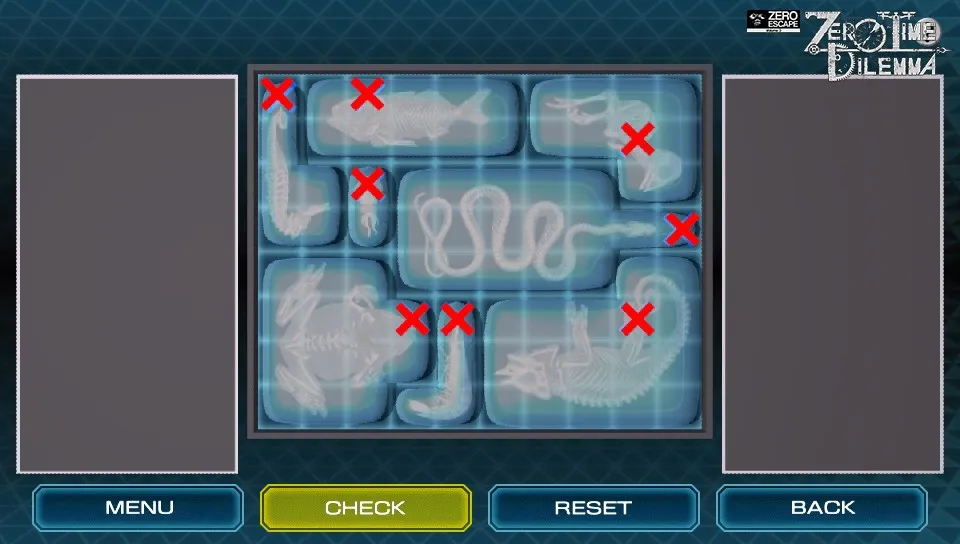
Down near the door is a locker with a colored button lock. You need to push each button a certain number of times in order to unlock the locker, your clues coming from those test tubes. Solution. When you open the locker, you’ll be greeted with another puzzle where you need to arrange objects to fit in the middle area, this time animal skeletons. Solution. In exchange, you receive some colored capsules, which you should examine.
Find the UV radiator, and put the centrifuge cover in it. Doing so will reveals words on the back: “Orange, Blue, White.” Go back to the centrifuge to mix the red and yellow test tubes, making an orange liquid.
On the other desk, you can open the machine by placing the knife in the small hole. Place the liquids inside it in the correct order to obtain a cylinder containing a human fetus. Then, take note of the monitor next to the machine showing symbols and colors: yellow bird, pink fish, white insect, red plant, blue human.
Now, take a look at the specimen shelves across from the locker. Place the fetus in the empty spot, and then you’ll need to arrange the canisters in order so you can move on. The butterfly, however, cannot be moved. Solution. This will reveal a fingerprint scanning device, which you need to tap on to interact with.
At this point, you’ll be able to move the sink. Tape it to move it into position. Tap it again to make the machine holding the pig jar light up, and then tap on that to move it next to the sink. This will cause the pig jar to boil and break, releasing the pig. Pick up the pig. Place it next to the sink. Check out the drawer under the sink to retrieve a scalpel, and slash the pig’s stomach.
Pod Room – Puzzle Solutions
Hammer top puzzle:
Note: Unless otherwise stated, move each piece all the way in the indicated direction.
1. Slide the green piece to the right
2. Slide the red piece up
Hammer bottom puzzle
1. Slide blue piece up
2. Slide green piece left
3. Slide red piece down
Room rotation to expose large driver case:
Hit the following circles. Note: Indicated directions are with respect to your view as it changes, but if I say to hit a circle multiple times, I’m referring to the same one.
Upper right
Facing you
Bottom right
Facing you (on other section)
Bottom right
Upper left x 4 (i.e. hit the same circle four times)
Large driver top puzzle
1. Slide right green piece up
2. Slide right green piece to the left
3. Slide right blue piece up
4. Slide right yellow piece right
5. Slide right yellow piece down
6. Slide top green piece right
7. Slide same green piece down
8. Slide left green piece up
9. Slide left green piece right
10. Slide left blue piece up
11. Slide left yellow piece left
12. Slide left yellow piece down
13. Slide both blue pieces down
14. Slide top green piece left
15. Slide right green piece up
16. Slide right green piece right
17. Slide red piece up
Large driver bottom puzzle:
1. Slide blue pieces out towards edges
2. Slide green pieces out towards edges
3. Slide purple piece up
4. Slide right green piece left
5. Slide right yellow piece left
6. Slide right blue piece down
7. Slide purple piece right
8. Slide purple piece up
9. Slide right green piece up
10. Slide right green piece right
11. Slide right yellow piece up
12. Slide left green piece right
13. Slide left yellow piece right
14. Slide left blue piece down
15. Slide top yellow piece right
16. Slide top yellow piece up
17. Slide top green piece left
18. Slide right green piece up
19. Slide right green piece right
20. Slide right yellow piece left so it's aligned with red
21. Slide right yellow piece up
22. Slide right blue piece left
23. Slide right yellow piece down
24. Slide right yellow piece right
25. Slide red piece down
Room rotation to get gear piece:
Upper right x 4
Target left puzzle:
1. Slide green piece clockwise
2. Slide blue piece up
3. Slide green piece counter-clockwise
4. Slide red piece left
Target right puzzle:
1. Slide yellow piece down
2. Slide green piece left
3. Slide yellow piece up
4. Slide blue piece clockwise one quarter turn
5. Slide red piece right
Target inner circle: (Directional letters) LLLRL
Target middle circle: RRRRRRLRLRLRLRLR (This probably isn’t the best solution, but it works.)
Target outer circle: RRLLLLLLRL
Room rotation to align green lines: LLLLR
Shotgun left puzzle:
1. Slide short green piece left
2. Slide Z piece down
3. Slide Z piece left
4. Slide C piece down
5. Slide upper yellow piece left
6. Slide long green piece up
7. Slide T piece up
8. Slide T piece right
9. Slide bottom yellow piece down
10. Slide top yellow piece down
11. Slide long green piece left
12. Slide T piece up
13. Slide C piece up
14. Slide Z piece right
15. Slide L piece down
16. Slide C piece left
17. Slide C piece up
18. Slide Z piece up
19. Slide short green piece right
20. Slide L piece down
21. Slide L piece right
22. Slide bottom yellow piece down
23. Slide top yellow piece down
24. Slide C piece left
25. Slide Z piece up
26. Slide short green piece up
27. Slide L piece right
28. Slide C piece down
29. Slide C piece right
30. Slide C piece down
31. Slide Z piece left one mark
32. Slide Z piece up
33. Slide short green piece left
34. Slide short green piece up
35. Slide red piece left
Shotgun right puzzle:
1. Slide top blue piece up
2. Slide top green piece up
3. Slide top green piece right
4. Slide top green piece up
5. Slide bottom blue piece right
6. Slide left yellow piece up
7. Slide left yellow piece right
8. Slide left yellow piece up
9. Slide bottom green piece down
10. Slide cross piece left
11. Slide cross piece up
12. Slide bottom green piece up
13. Slide bottom blue piece left
14. Slide bottom cyan piece left
15. Slide right yellow piece left
16. Slide top cyan piece down
17. Slide top yellow piece right
18. Slide top yellow piece up
19. Slide cross piece right
20. Slide cross piece up
21. Slide bottom green piece up
22. Slide bottom yellow piece up
23. Slide red piece right
Library – Puzzle Solutions
Birdman cylinder: The figures inside how much letters ahead of what’s written on the card you should enter. So, H + 5, F + 3, G + 7, and Y + 5. So the code is MIND.
Portraits: Use the gun on Carlos, Akane, and Junpei. Use the crossbow on Q, Eric, and Mira. You can tap on them without weapons to confirm which is which.
Second chair code: J + 7, 05 + 7, 03 + 7 = Q-12-10
Biolab – Puzzle Solutions
Locker code: Blue 2, Yellow 5, Red 3, White 1
Animal skeleton puzzle:
Specimens: You should have noticed that the capsules you collected formed numbers. Using their colors – yellow 1, pink 2, blue 3, red 5 – and the clue on the one monitor, you should be able to arrange them in order. But if you’re still having trouble, the order from left to right is penguin, seahorse, fetus, butterfly, and root.
Healing Room – Hints
Check out the old fashioned cabinet. Get the note, showing a star, a pitcher, a glass, and an eye. Get the tumbler and the bottle of water. Then tap the drawers to get the box of matches. Use them to light the candle on the table between the two lounge chairs.
Investigate the dial on the wall and turn it once to get the flower pattern on the walls. To the right of the exit door should be an indentation containing a large hunting knife. Turn the dial back to black and white. There should be a poster near the cabinet that says, “Defeat me.” Use the knife. This should turn on the large console next to the dial.
The monitor on the console says, “Shoot more keys,” as if you shot any to begin with. Pull down the lever on the bottom right to obtain a digital camera. In order to use the camera, you just need it to be in hand and tap on something to take a photo. While in this room, tap on that weird spot on the wall behind the left lounge chair to “shoot” the key.
Turn the dial now to the forest scene. Below the dial will be a circular light pattern. Place the tumbler in the middle of it and shoot that. In the large pillar-like water tank is a plate you also need to shoot. Tap on the headrest of the left lounge chair, which will prompt you to change the angle before shooting. Line up the mark on the wall with the headrest to make a key, and tap to shoot. Finally, tap on the candle on the table.
Turn the dial back to flowers. You’ll need to solve the flower puzzle on the wall behind the tank. Each spot on the puzzle goes through three phases: sprout, bud, and flower. Tapping on any spot advances it two phases, looping back around if fully bloomed, and advances the four spots around it one phase. Your goal is to make all the spots bear fully bloomed flowers. Solution. Once you do, the bud above the puzzle will bloom, and you can shoot it with the camera.
Go to the keyboard behind you, and tap each key to obtain it. I suggest tapping them in order from left to right if you know nothing about keyboards or notes like me. Go to the console and insert the two C keys, D, E, F, and G.
Turn the dial to the sky now. Above the keyboard, fill the pitcher and glass with water, and shoot the scene with the camera. A projection will suddenly emerge from the wall. When it pauses, you can tap it to shoot the key. Head back to the console and insert the A and B keys. Press the play button on the bottom left, and a tune will play before the keys fall out. Despite the missing keys, pressing the play button again will play the tune again. Also, the note below each keyhole lights up, so if you’re hearing impaired, you should still be able to take note of the tune. Speed and meter won’t matter.
Go to the keyboard, and put the keys in. They will also go back in one shot. Play the tune to reveal the blue button. Solution.
Manufacturing – Hints
Pick up the various papers on the floor. You’ve got Note 3, which lists “Alex, Betty, Charley,” going down. Note 2 shows, “White, Red, Blue,” going down. On the lathe, get the screwdriver head. On the other machine, grab the wire cutters. On the table in the middle of the room, you can get the screwdriver grip, which you’ll combine with the head to make one screwdriver. There’s also a stun gun and a note. Note 1 reads, “From far left, 4 right, 1 left, 2 left, 4 right, 3 left, boot up!” going down. Finally, you’ll find three blueprints, the first showing a diagram and “Cut Betty,” the second with a different diagram and “Cut Charley,” and the third being a confusing bunch of connections.
Use the stun gun on the hi-volt contactor. You need to activate each node based on the clue you found in Note 1. It’s literal, but keep in mind that the first one is the “far left.” This will power up the robots. Talk to them, and Betty will instruct you to set the timer to zero. She is, of course, referring to the bomb in the room. Tap the timer button (black) to set it as instructed.
A new console will appear next to the robots. Use the wire cutters, keeping in mind Note 2, Note 3, and the first blueprint. You’ll be using them in order. So cut the red wire and remove the screws. You don’t need to back out and change the item in hand to do this. In response, Alex will hand you a note saying, “Cut Betty.”
Return to disarming the bomb. You’ll need to remove the screws carefully so the hammers won’t swing down and hit the pendulum in the middle or the other hammers, causing the same result. Solution. Doing so causes Betty to lose her shit. Follow the same two notes but now use blueprint 2. You’ll cut the blue wire and remove more screws, and Betty will continue acting crazy.
Lastly, follow Alex’s note, and cut the red wire within the time limit. RIP Betty.
Trash Disposal – Hints
Grab the gas torch near the incinerator door. Then, head to the locker on the other side of the room. Open it to grab the toolbox and the mask. Examine the mask to put it on. You’ll be able to put it on just by making it the object in hand in the future.
Look at the poster on the wall that very obviously highlights the three letters, “tic.” Then, look at the chute cover next to the locker, which very obviously shows a screwdriver and two screws. Head to the main console controls, and tap on the sliders. Enter those three obvious letters to open the shutter, letting light into the incinerator.
Tap on the incinerator window (yellow) to switch perspective to Phi. Pick up the screwdriver hanging out in one of the burners. Remove the screws on the large metal panel beneath it, revealing the “188 pounds” message. You don’t really need this message, but tapping on it a few times will make it apparent as to what it was for.
There is a scale on the right of the panel, and you only have two objects to weigh: the screwdriver and the screws. Do so, and take note of the weights, 133 grams and 22 grams, respectively. Switch back to Diana by tapping on the window again. Head to the chute, and enter the total weight into the dials.
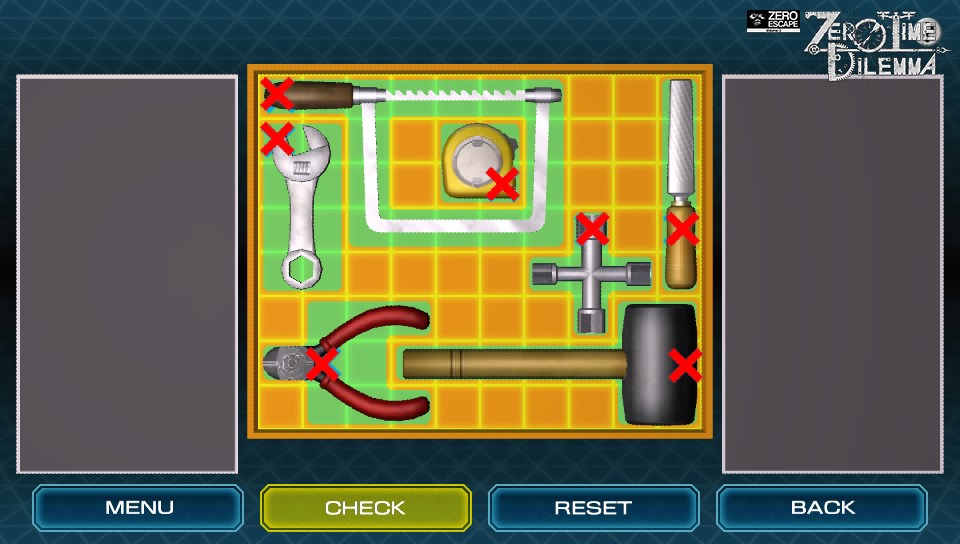
Send the toolbox through the chute. Open it using the screwdriver, which will reveal yet another arrangement puzzle, this one involving tools. Solution. Solving this gives you a note stating, “Max out the needle!” Switch with Diana again, and send the torch through the chute. Use the torch on the thermometer inside the incinerator to the right of the scale. As Diana, you should be able to grab the coin that was stuck in the thermometer on the console.
Head to the caged red button on the wall, and use the coin to remove the screws. Push the button, revealing a chair. Investigate it, which will trap Sigma in it and drop the glass box that was hanging from the ceiling. Pick it up and send it through the chute. Phi can use the screwdriver grip to remove the lock.
Have Diana pull the glass box back up and retrieve the revolver, which can be placed in the keyhole next to Sigma.
Like the decision in the Rec Room, if there’s a possibility it could happen, you may need to try more than once. On my second playthrough, I actually had to try six times, so that was fun.
Transporter Room – Hints
Pick up all the cards lying about. Most are on the floor, but a few are on some tables nearby. There is a monitor that says, “Place cards here.” Do literally that for all 13, and they should activate and change color. The screen will say, “Activated,” and a holographic book will appear. Tap to read it. You’ll only have access to Chapter 1, which shows the wind symbol, which equals zero.
Now, the nucleus should display some purple symbols: birdman birdman birdman flower human. Also, the pentagonal board, where you grabbed a card from, will activate. By placing each card down on the board, you can learn how they relate to each other. Different cards will be compared to different symbols, but placing the same card down multiple times will always reveal the same comparison.
You should be able to inspect the book again; it’ll say, “New!” in red above it. Read Chapter 2, which explains that the symbols represent the numbers zero through 12, and that when they are next to each other, you multiply them. Leaving this chapter will reveal a red Question button where you’ll need to actually figure out what number each card represents. Here is a tip: each unique solitary symbol is a prime number. Solution. Solving this opens Chapter 3, which documents the numbers permanently, and Chapter 4, telling you how to operate the nucleus.
Leaving the book should turn on a new monitor near the one where you activated the cards. The first shows all the numbers and a blue gear. Tapping it 3D prints five gears with the symbols for 0 through 9 on them, thus representing digits. Then, the monitor will show a red gear. Tapping prints four gears with all the alien symbols on them.
Head to the table with the weird device on it, and tap it with the gears to put them in. Based on the symbols above the nucleus and its operating manual, you need to adjust the five digit gears and turn the crank to reveal the cards you need to place vertically to turn on the machine. If you need more clues about what digits you need to enter, keep tapping on the hologram above the nucleus. Eventually, they’ll very specifically tell you what to enter, and you won’t need a calculator. Solution.
On the nucleus, tap on it to begin entering the cards as requested. Solution.
Locker Room – Hints
Look at the lockers. Open the first locker on the left to get Note 1: “The power supply must be restarted to unlock the door.” Open the second locker to get the conversion plug. Head to the sinks. Pick up the hair dryer on the left, combine it with the conversion plug, and plug it in. Tap on it to use on the exhaust fan, which has the phrase, “<- SPIN,” next to it. This reveals the words, “violet, white, blue, red.”
Open the fourth lock by entering this color code, and get a coin and a remote control. The red device on the wall next to the lockers is the aforementioned power supply. Tap the cable on the left to plug it in, and use the coin to unscrew the panel. Tap either switch to move the lighting from one side of the room to the other.
Examine the remote control and when prompted, choose “Yes” to push the button. This will drain the hazardous water. Examine the drain to get the round piece inside it. Open the second stall from the right, and grab note 2: “Full submerge the power supply in water to restart.” Open the leftmost stall, and grab the bucket. Put the bucket on the spigot in the rightmost stall, the one with no door.
Clear the bucket from your in-hand inventory. Otherwise, you’ll foolishly try splashing water on the power supply to no avail. You want to change the lighting again instead. Inspect the drain cover, which shows glowing numbers on it.
Head to the sinks. Unplug the sink on the right. Pour the bucket of water in the right sink. Grab the key from the left sink. Now open the third locker by punching the numbers in the order drawn on the drain cover. Solution. This will reveal another box puzzle where you need to rotate the surfaces. (Do you see what I mean in my review now?) My suggestion for starting is rotating the box down a little bit, rotate the triangle piece so the cloud is to the left, then rotate the pink square next to it to match the cloud. It’s easy from there. You’ll get a screwdriver.
Switch the lighting again. Open the second stall from the left. Use the screwdriver to remove the small rectangular panel from the tank. Attach the round piece, and push the button it makes. Get the c-shaped pieces from the tank deposit on the bottom. Place it in the power supply, and the lights on both sides will now be on.
Open the shower stall with the key and grab the hose. Open the fifth locker to reveal the music box that says it requires water to play. In the rightmost stall, use the screwdriver to remove the shower head. Attach the hose where the head was, and it will automatically get connected to the music box. The drawer on it will open, giving you Note 3: “Fill the room with water!” At this point, water will be flooding in.
Enter the shower stall with Sigma. Push the red button on the remote control by examining it again. When you can finally come out, push the RESET button on the power supply.
Thanks for reading!
Flower puzzle: Assuming each column is a letter from A through E, and each row is a number from 1 to 3, tap the following spots in this order to solve the puzzle: A1, A3, C1, C3, D2. Note: I hate puzzles like these and am surprised I found such a simple solution for you.
Keyboard tune: G E F C2 C1 D A B
Manufacturing – Puzzle Solutions
Hammer screws: Remove them in the following order: top right, middle right, bottom right, third one down on the left, left top, second one down on the left, and the last one left.
Trash Disposal – Puzzle Solutions
Transporter Room – Puzzle Solutions
Numbers:
Wind – 0
Sun – 1
Moon – 2
Human – 3
Two moons – 4
Star – 5
Human x moon – 6
Flower – 7
Three moons – 8
Two humans – 9
Star x moon – 10
Birdman – 11
Human x two moons – 12
Number device: 27951 or moon, flower, two humans, star, sun
Nucleus code: (from the top down) human x two moons, two humans, star, sun
Trash Disposal – Puzzle Solutions
ZTD Rec Room Heart Puzzle
-
ZTD Rec Room Heart Puzzle #1
-
ZTD Rec Room Heart Puzzle #2
-
ZTD Rec Room Heart Puzzle #3
-
ZTD Rec Room Heart Puzzle #4
-
ZTD Rec Room Heart Puzzle #5
-
ZTD Rec Room Heart Puzzle #6
-
ZTD Rec Room Heart Puzzle #7
-
ZTD Rec Room Heart Puzzle #8
-
ZTD Rec Room Heart Puzzle #9

-
ZTD Rec Room Heart Puzzle #10